Dre Does an Adele Inspired Tutorial
/I shared the picture above asking if you guys would like to see my Adele inspired makeup look and the response was overwhelming! Thank you always for your support! I obviously bought Adele's album the day it came out and every time I listened to it on my phone, the photo above of her makeup was looking back and me and I knew I wanted to re-create it. I realize it's not a color photo but the defined and contoured eyelook was what I was after. The look is super easy and honestly a great look with or without the liquid liner, for those of you who are still working on the perfect wing! The thing I like most about this look is that it is about layering shadows from light to dark, so you're in complete control of how light or dark you want to make it. Every shadow I used was from the Too Faced Natural Matte Palette and while you certainly don't need this palette to get this look, I highly suggest investing in it or adding it to your christmas wishlist. I don't know what I would have done without this palette for my freelance kit because everything you need to start and blend a look is in it. Without this turning into a Too Faced review....let's begin!
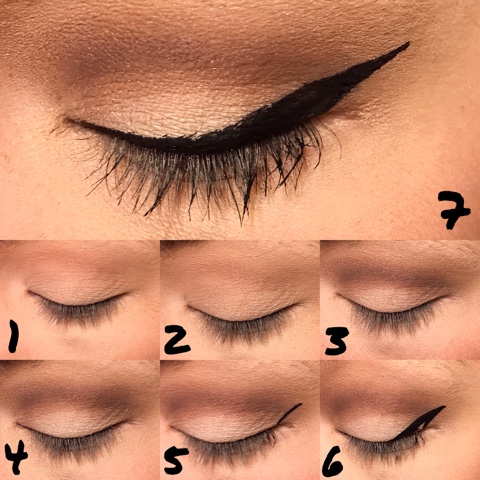
1. As usual I started with a primed eyelid and then applied Heaven from lashline to brow bone using a flat shader brush.
2. Using a very fluffy blending brush I mixed Lace Teddy and Nude together and applied them throughout the crease. As you can see this doesn't appear too much darker than the Heaven shade, but thats what I want. This look is all about slowly building the color and blending A LOT! Adding the lighter/medium shades in the crease will make blending the darker colors much easier.
3. Next, I mixed Cashmere Bunny and Risqué on a pencil brush and applied it in my crease. Using the same fluffy blending brush from step 2, I blend the crease color out. I want the edges to be more blended on the top as you can see but the area where my crease meets my lid, I keep pretty intense and not so faded.
4. The last shadow step is to take some more of Heaven and apply it to the lid to create that contrast between the dark crease and light lid. This is what gives Adele's look that defined and contoured eye shape.
5. Next it's time for liquid eyeliner. In this look I used the NYC Liquid Eyeliner which is such an inexpensive and great product. It's only a couple dollars and is especially great for those who are practicing winged liner because you won't feel bad wasting expensive liner if you have to remove and re-apply. I always start my winged liner with a small line extending from the end of my lashline outwards. The angle I create is based on following my bottom lashline and extending that line out.
6. Next, I draw from the end of the tail I've created back to my lashline, creating a little triangle.
7. Lastly, I create the line along my lashline from the inside of my eye connecting to the tail I've just made. If this seems super confusing let me know and I can create a post completely devoted to how I do winged eyeliner!
(I unfortunately didn't get a picture after I finished my eyeliner, but I always perfect that line of liquid liner along my lid at the end to create a smooth line so please excuse any uneveness!)
8. The last step is lining your waterlines. I used Black on the top lashline and NYX's Wonder Pencil (a nude shade) on the bottom to get that bright open-eyed look like Adele has in the album cover. Two coats of your favorite mascara and you're done!
And that's it! You can get Adele inspired makeup that easily! Let me know if you have any questions or requests of makeup looks to recreate. I really enjoy recreating celebrity looks for you guys!
I hope you all had a wonderful Thanksgiving and please know that I am so thankful for you!
Have a beautiful day,
Dre


