I Made a Sephora Purchase

There’s a reason I don’t share a lot of hauls here. I personally don’t like adding into the consumerism of the thousands of people that are already sharing their recent purchases. I don’t want you to ever feel pressured to buy something or think that in order to enjoy makeup, you have to buy the newest products. However, I cannot ignore that many of you come to me for opinions on specific brands, products, techniques, etc. Some of this ‘hauling’ just comes with the territory.

Today I wanted to share some items I’ve recently picked up from Sephora. It happened to coincide with the Sephora VIB spring sale, but I’m definitely not here to say ‘YOU HAVE TO BUY SOMETHING BECAUSE OF THE SALE’, because I couldn’t disagree with that more. In fact, my opinion is quite the opposite.

I prefer to purchase the items I know I need (for my kit) or know I want to try, regardless of the sale price. At the end of the day, I think it’s valuable for you to see items I would purchase full price (meaning they are worth their price tag), or only purchase when I can get a discount. So these are the reasons, I’ve decided to implement a couple hauls a year into the blog. You may find some items to add to your wish list, and it could also spark some ideas of content you’d like to see from me.

Now that we’re done with that disclaimer, let’s get into what I recently got in my two Sephora purchases.

Apple Cider Vinegar Acid Peel - The INKEY List

I have been hearing great things about the INKEY list and knew I wanted to pick something up from the line. When I have plenty of products on hand that are skincare basics, like cleansers, toners, moisturizers, etc, I tend to go for treatment options like masks or peels to test out a brand, since you don’t have to use them every day to try them out. I am really excited to give this one a test because I love a good chemical exfoliant. I keep seeing the INKEY list being compared to The Ordinary, so I’m excited to see if I like another affordable skincare option.

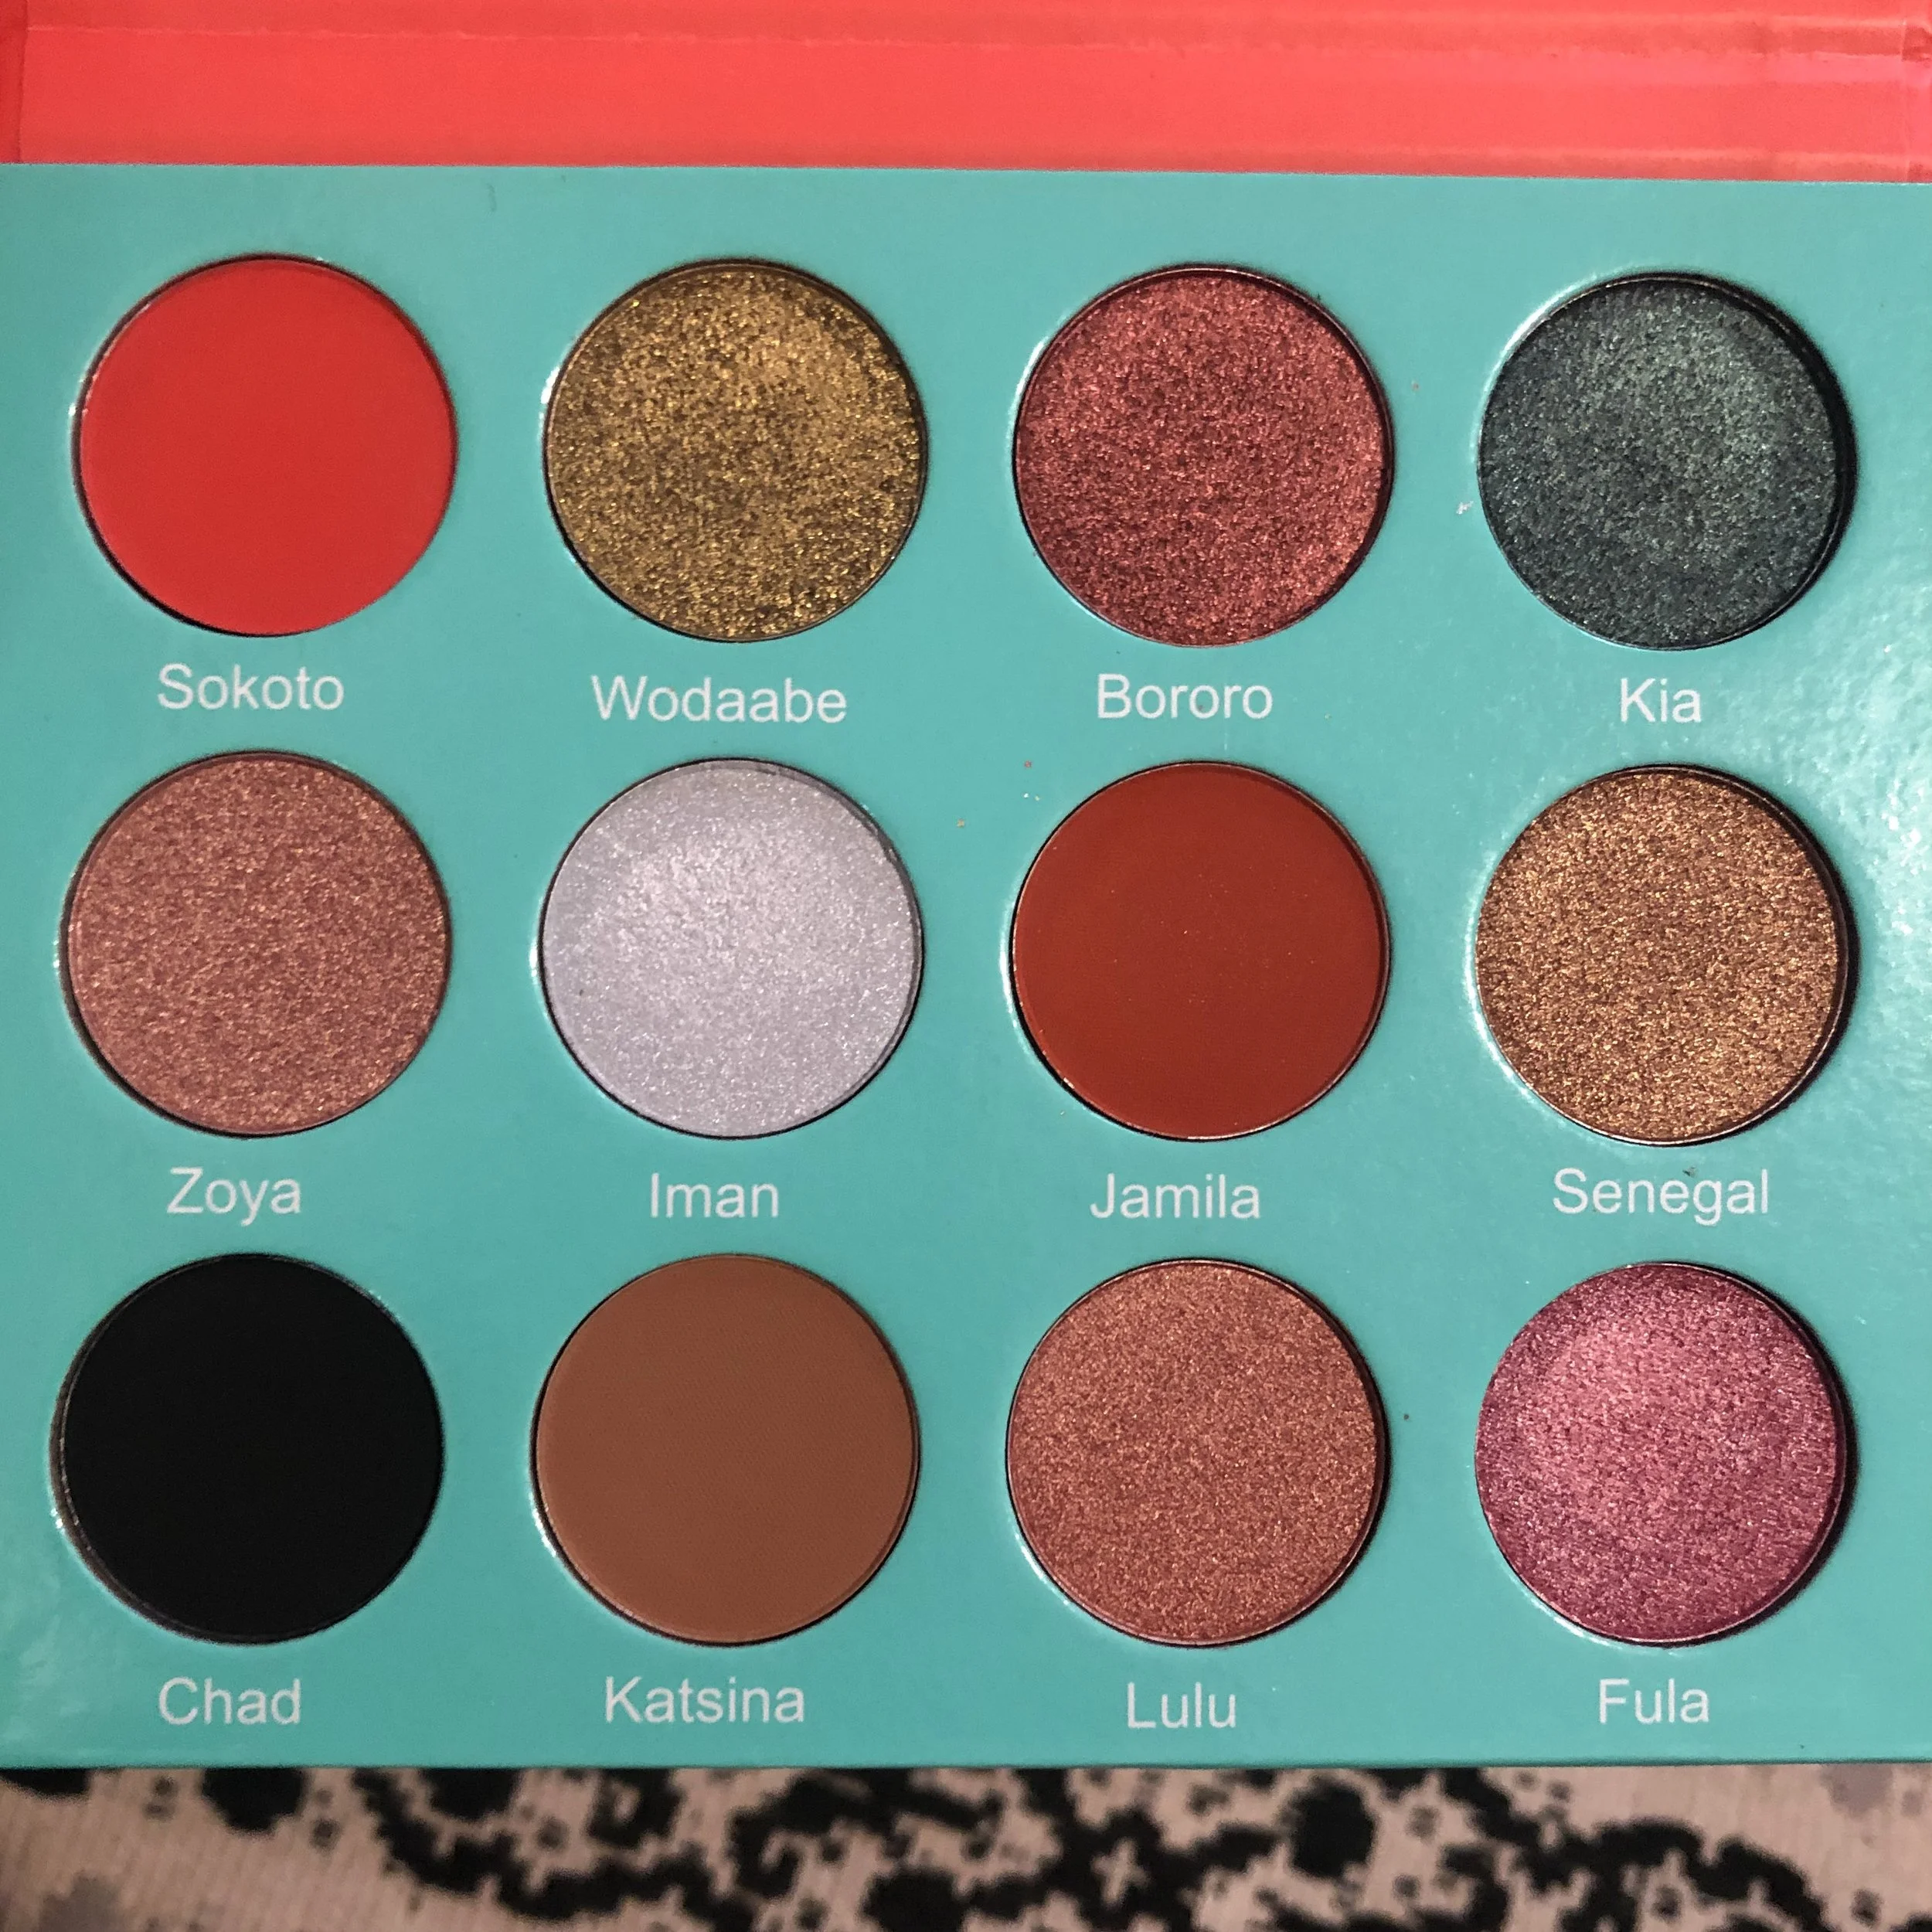
Mercury Retrograde Eyeshadow Palette - Huda Beauty

This eyeshadow palette was not on my To Buy list originally, but when I saw that it went on sale for $20 OFF (at the time I’m writing this it’s still available and on sale so check it out if you’re interested), and I knew I had a gift card to use, I decided to get it! Since it’s no shock that I spend more than the average person on beauty products every year, I try to use gift cards for items that I just want because I often buy so many that I simply need for my kit. This is how I stay excited about makeup! I had been wanting to try a larger Huda Beauty palette for awhile and I loved that this one was equal parts neutrals and fun shades for spring. I will be filming a tutorial with it soon for you so be on the lookout!

Mini Glam Eyeshadow Palette - Natasha Denona & Mini Retro Eyeshadow Palette- Natasha Denona

I’m lumping these two together because I feel the same way about both! I have really been wanting to try the Natasha Denona eyeshadow formula because many claim it is the best formula they have EVER tried. If you’ve looked at her prices, her palettes aren’t cheap, so I figured picking two Mini Palettes would be a great way to get introduced to the brand to see if I want to invest in some larger palettes for my kit. I went with these more neutral / cool toned palettes because I tend to buy warm toned palettes and already have so many I enjoy. There really is plenty of room in my personal and kit collections for new cool toned palettes!

Discovery Eyeshadow Palette - Rare Beauty

Rare Beauty is another brand I have been thinking about trying, but it honestly wasn’t until I saw this palette that I had any serious interest in trying anything soon. I was excited to see this color story, and will definitely be creating some looks with this palette once I receive it. Have you tried anything from Rare Beauty yet that you think I should try? I don’t know why but I tend to start with eyeshadow palettes when I test out a brand. Maybe it’s because I don’t feel like I’m ‘opening’ up a new product.

Radiant Creamy Concealer - NARS

After much hesitation, I finally hopped on the NARS creamy concealer train earlier this year. I ended up falling in love with it but I still don’t think I will ever purchase this one at full price. There’s simply too many great concealers at cheaper price points, for me to spend $30 on this one, so it’s likely one you’ll see in Sephora or Ulta sales or GC purchases.

BeachPlease Lip + Cheek Cream Blush in Rush Hour - Tower 28

Lastly, I knew I had to get my hands on one of these Lip and Cheek Cream Blushes because everyone is talking about them, and I LOVE a good cream face product for spring and summer. I love my peaches this time of year. If I like the formula, I could easily see myself picking up a shade or two for use in my every day collection.

Did you pick anything up in the Sephora sale? Comment below and let me know if you are excited to test out anything new to you, or if there are any tried and true favorites you restocked!

I hope you enjoyed seeing what I picked up and I’ll see you in my next post soon,

Andrea

Disclosure: Some of the above links are Affiliate links meaning that I make a commission off the purchase of the product through my link. This does not affect the price of the product on your end. I would never recommend a product that I didn't love and all opinions are my own. I am thankful for you choosing to purchase through my links, as it helps me create more content for Andrea Fontana Beauty

Should You Buy a Juvia's Place Eyeshadow Palette?

Do you want me to give you the answer right now? Ok. Yes, you should. You should buy them all. haha Except maybe you don’t need them all. So let me share which palettes I’ve tried and why I love them so much.

I had been hearing great things about Juvia’s Place Eyeshadow palettes, so I purchased the Warrior Palette last November and after using it for one wedding, I immediately purchased three more online at Ulta.com.

The quality of these shadows is amazing.; some of the best eyeshadows I’ve ever used. The mattes blend so easily and evenly, the metallics give a beautiful even sheen. The pigment is unreal! On top of all of this, I still can’t believe the price of these shadows. You get so much product for such an affordable price.

So which palette is right for you?

The Warrior ($20):

This palette is perfect for someone who likes neutrals. If you’re a makeup artist, this one is a must have. It’s perfect for bridal looks. It has your necessary three matte shades, gold, bronze, champagne, rose gold, and copper. If you use a lot of these shades and wear makeup often, it’s a great option.

IMG_9282.JPG
IMG_9281.JPG
IMG_9280.JPG

The Nubian ($20):

This palette is perfect for a beginner or someone who is looking for a first or second makeup palette. It has your warmer every day basic shadows; some matte and some shimmer. If you’re someone who does a lot of one or two eyeshadow looks and likes to keep it simple, I think this one would be the best choice for you. It’s also the smallest and easiest to travel with!

IMG_9288.JPG
IMG_9287.JPG
IMG_9279.JPG

The Nubian 2 ($20):

This palette is where things get a little more fun. If you already have eyeshadow palettes which your basic shades, this would be a great addition. There’s a great rust shade, warm gold, olive green, royal blue, deep purple and more! If you’re looking for some colors to add to your collection that are a little deeper and jewel toned, this would be a great purchase!

IMG_9277.JPG
IMG_9276.jpg

The Saharan ($20):

Where are all of my warm eyeshadow color lovers? This palette is necessary for someone who loves the rusty red, burnt orange, pinks, etc. I personally love this color palette and have had so much fun creating looks that are a little more unique.

IMG_9285.JPG
IMG_9284.JPG
IMG_9283.JPG

Have you tried any Juvia’s Place palettes before? They have many more and I’m excited to expand my collection!

Have a beautiful weekend,

Andrea

Happimess Eyeshadow & Lipstick Review

IMG_7495.jpg

I was scrolling through Instagram one day and discovered the launch of a cosmetics brand that I had never heard of; Happimess.

I was intrigued by their packaging and products to click further and check it out! I was super excited to find how inexpensive their items are. After discovering how much I love the Maybelline Soda Pop and Lemonade Craze palettes, I’ve recently been on the hunt for other inexpensive but good quality palettes. I was really interested in Happimess palettes because I find that glitter and matte formulas tend to be the hardest to find inexpensively and the palette I ordered came with both!

I had a launch coupon code so I decided to try out some lipsticks and an eyeshadow duo, on top of the ‘Next to Me’ palette. Here my thoughts…

‘Next to Me’ Eyeshadow Palette ($12):

FullSizeRender.jpg

I was really happy with the quality of this palette for the amazing price of $12 (I got it even cheaper)! I loved how in this palette there is a good balance of matte and metallic shadows and even a glitter. The matte shades are not chalky and blend very well and the metallic shades are stunning! I love using the halographic glitter shade as a topper to give extra dimension. It’s so pretty. Overall I’m really impressed with this palette.

Accompanied Eyeshadow Duo in ‘Love Lay Here’ ($5):

I got this duo because I love really warm matte shadows to quickly swipe on my lid and blend out when I’m in a hurry. I loved that it was tiny and easy to pop in my makeup bag for the gym and that it had the two colors in one pan. What’s cool about their single and duo eyeshadows is that if you have multiple you can connect them into one unit which would be nice to create your own palette of shades! I again am impressed with the quality of matte shadows for the price.

High Class Lipsticks in ‘Deep Lilac’ & ‘Plum Red’ ($10):

High Class Lipstick in Deep Lilac

High Class Lipstick in Deep Lilac

High Class Lipstick in Plum Red

High Class Lipstick in Plum Red

High Class Lipstick in Plum Red but applied with my finger as a stain.

High Class Lipstick in Plum Red but applied with my finger as a stain.

I haven’t tried many lipsticks recently, so I was excited to give these a try. They have another formula but it seemed glossier and since I'm more of a matte girl I went with this satin formula. I have been obsessed with applying these with my finger to give my lips more of a stained look. I find this helps the lipstick stay on longer and I love the subtle pop of color it gives to a makeup look. I love how the satin formula keeps my lips from feeling dried out too. Overall I’m really happy with this lipstick.

As you can tell, I’ve been pleasantly surprised by Happimess. I love everything I purchased and I still can’t believe how inexpensive the prices are for the quality you get. I should also mention that the products are overall more natural than most and if you click on each product it will tell you in the description all of the nasty ingredients it is free from!

What new brands have you tried recently? What should I try next? Comment below and let me know!

Have a great day,

Andrea

Disclosure: All products were purchased with my own money and all opinions are my own.

Maybelline 'Soda Pop' Palette Makeup Tutorial Video

I am finally back with another YouTube video for you guys! My bridal season this fall has been amazing, but so incredibly busy, which means I’ve been neglecting my YouTube channel. I’m finally starting to feel inspired again however, so I sat down and filmed this really easy, warm & purple fall eyeshadow look for you using the Maybelline ‘Soda Pop’ palette. Let me know in the comments below if you have tried this or the Lemonade palette by Maybelline!

As usual, the products I’ve used are listed below the video. Let me know if you like this style of video and want to see more! I have a lot of fun creating these for you!

Products Used in order (Click on products for Links):

Weleda Skin Food

NYX Honey Dew Me Up Primer

MAKE UP FOR EVER Ultra HD Foundation

Maybelline Master Strobing Liquid Illuminating Highlighter in Light/Iridescent

IT Cosmetics Airbrush Buffing Foundation Brush

Maybelline Soda Pop Eyeshadow Palette

Real Techniques Deluxe Crease Eyeshadow Brush Set

MAC Pro Longwear Concealer NC20

Beauty Blender

RCMA No Color Powder

Fenty Beauty Match Stix Matte Skinstick in Amber

Milani Baked Blush in Luminoso

Rituel de Fille Rare Light Luminizer in Anthelion

L’Oreal Voluminous Lash Boosting Conditioning Primer Mascara

L’Oreal Voluminous Voluminous Original Carbon Black Mascara

L’Oreal Lipstick in 008 Fairly Nude (Apparently they don’t make this anymore…sorry!)

Hope you enjoyed this video and have the best weekend,

Andrea

Disclosure: Amazon links are Amazon Affiliate links meaning that I make a commission off the purchase of the product through my link. I would never recommend a product that I didn't love and all opinions are my own. I am thankful for you choosing to purchase through my links, as it helps me create more content for Andrea Fontana Beauty.

Easy Wedding Guest Makeup Look

I haven't done a step by step picture tutorial in a while for you guys and since it's wedding season, I thought I'd bring you one that is so easy! You only need 3 eyeshadows and a black eyeliner pencil and you're good to go. The technique can be done with WHATEVER colored eyeshadow you want. I used a brown one with copper sparkles but you can do a bright color like teal or maybe navy; both of which I think would be stunning. The possibilities are endless, so practice the technique and get to experimenting! I like how it gives a darker, soft and smokey look which is perfect if you have weddings to attend late summer/early fall! I used three shadows from the Anastasia Beverly Hills Artist Palette but you can use whatever you want! You'll just need a matte shade close to your skin tone, your main color, and a shimmering/metallic shade to jazz it up a bit! The brushes I used were simple and few too; one fluffy blending brush and one pencil brush! That's it! Now let's get started...

Before I began, I prepped my eyelid with some leftover concealer. Then I used the skin tone shade (Buttery) and put it all over my lid using the fluffy blending brush. I also added a thin line of black eyeliner.

Before I began, I prepped my eyelid with some leftover concealer. Then I used the skin tone shade (Buttery) and put it all over my lid using the fluffy blending brush. I also added a thin line of black eyeliner.

Next, I applied my main shade (Baby I'm a Star) with the pencil brush all over the eyeliner and blended it out slightly. Then I took my blending brush and blended the line out a little bit. The blending causes the pigment and shimmer to be lost so a…

Next, I applied my main shade (Baby I'm a Star) with the pencil brush all over the eyeliner and blended it out slightly. Then I took my blending brush and blended the line out a little bit. The blending causes the pigment and shimmer to be lost so add a little more shadow.

Keep adding more shadow and blending it out, until you have your desired intensity and smokiness. Lastly, I added the same main color on the outer 2/3 of my lower lash line and blended it out, and popped a little of my metallic shade (Beigely) to th…

Keep adding more shadow and blending it out, until you have your desired intensity and smokiness. Lastly, I added the same main color on the outer 2/3 of my lower lash line and blended it out, and popped a little of my metallic shade (Beigely) to the inner corner. 

FullSizeRender.jpg

Here are the shades that I used from the Anastasia Beverly Hills Artist Palette just for reference (the camera doesn't quite pickup the copper glitter in Baby I'm a Star but that's what makes this color fun). Remember thought! You can use whatever colors you want! I'm just trying to teach you the technique so you can create a perfect simple, but smokey eye makeup look that you can wear to any special nighttime event (or wear it in the daytime! I'm not here to judge)!

And now for the final look! I just finished the look off with one of my favorite mascaras (Loreal Voluminous Lash Paradise) and the eye look was complete! All other makeup details are listed below in the photo's caption!

Makeup Details: Foundation - Makeup Forever HD; Concealer - MAC Cosmetics Pro Longwear; Contour/Bronze - Fenty Beauty Match stix in Amber; Blush - Sephora Collection Colorful Face Powder in 007 Too Hot; Highlight - Milk Makeup Holographic Stick in M…

Makeup Details: Foundation - Makeup Forever HD; Concealer - MAC Cosmetics Pro Longwear; Contour/Bronze - Fenty Beauty Match stix in Amber; Blush - Sephora Collection Colorful Face Powder in 007 Too Hot; Highlight - Milk Makeup Holographic Stick in Mars; Lips - Nothing!, Brows - Nothing!

What do you guys think? Would you wear this look to the next wedding you need to attend? Leave a comment below and let me know what you think! And if you ever recreate it, send me a photo or tag me with #andreafontanabeauty on Instagram so I can see it!

Have a great weekend,

Andrea