Andrea's Pantry Staples

I have wanted to share this list for along time because I believe a well stocked pantry is VERY important to minimize the overwhelm of cooking meals at home. When I say well stocked I don’t mean that you need to have everything under the sun in there either. I simply mean that you have the basic building blocks to create a really great meal at any time. These are the items that can usually be found in my cupboards. What does your pantry look like? Comment below and let me know!

  1. Jasmine or Basmati Rice: These are my favorite two and I always have them on hand because they are a great staple gluten-free item.

  2. Brown Rice: I am not a huge fan of brown rice, but I do like it Chicken Tikka Masala because it’s texture holds up nicely to the sauce, so I keep a little of this on hand.

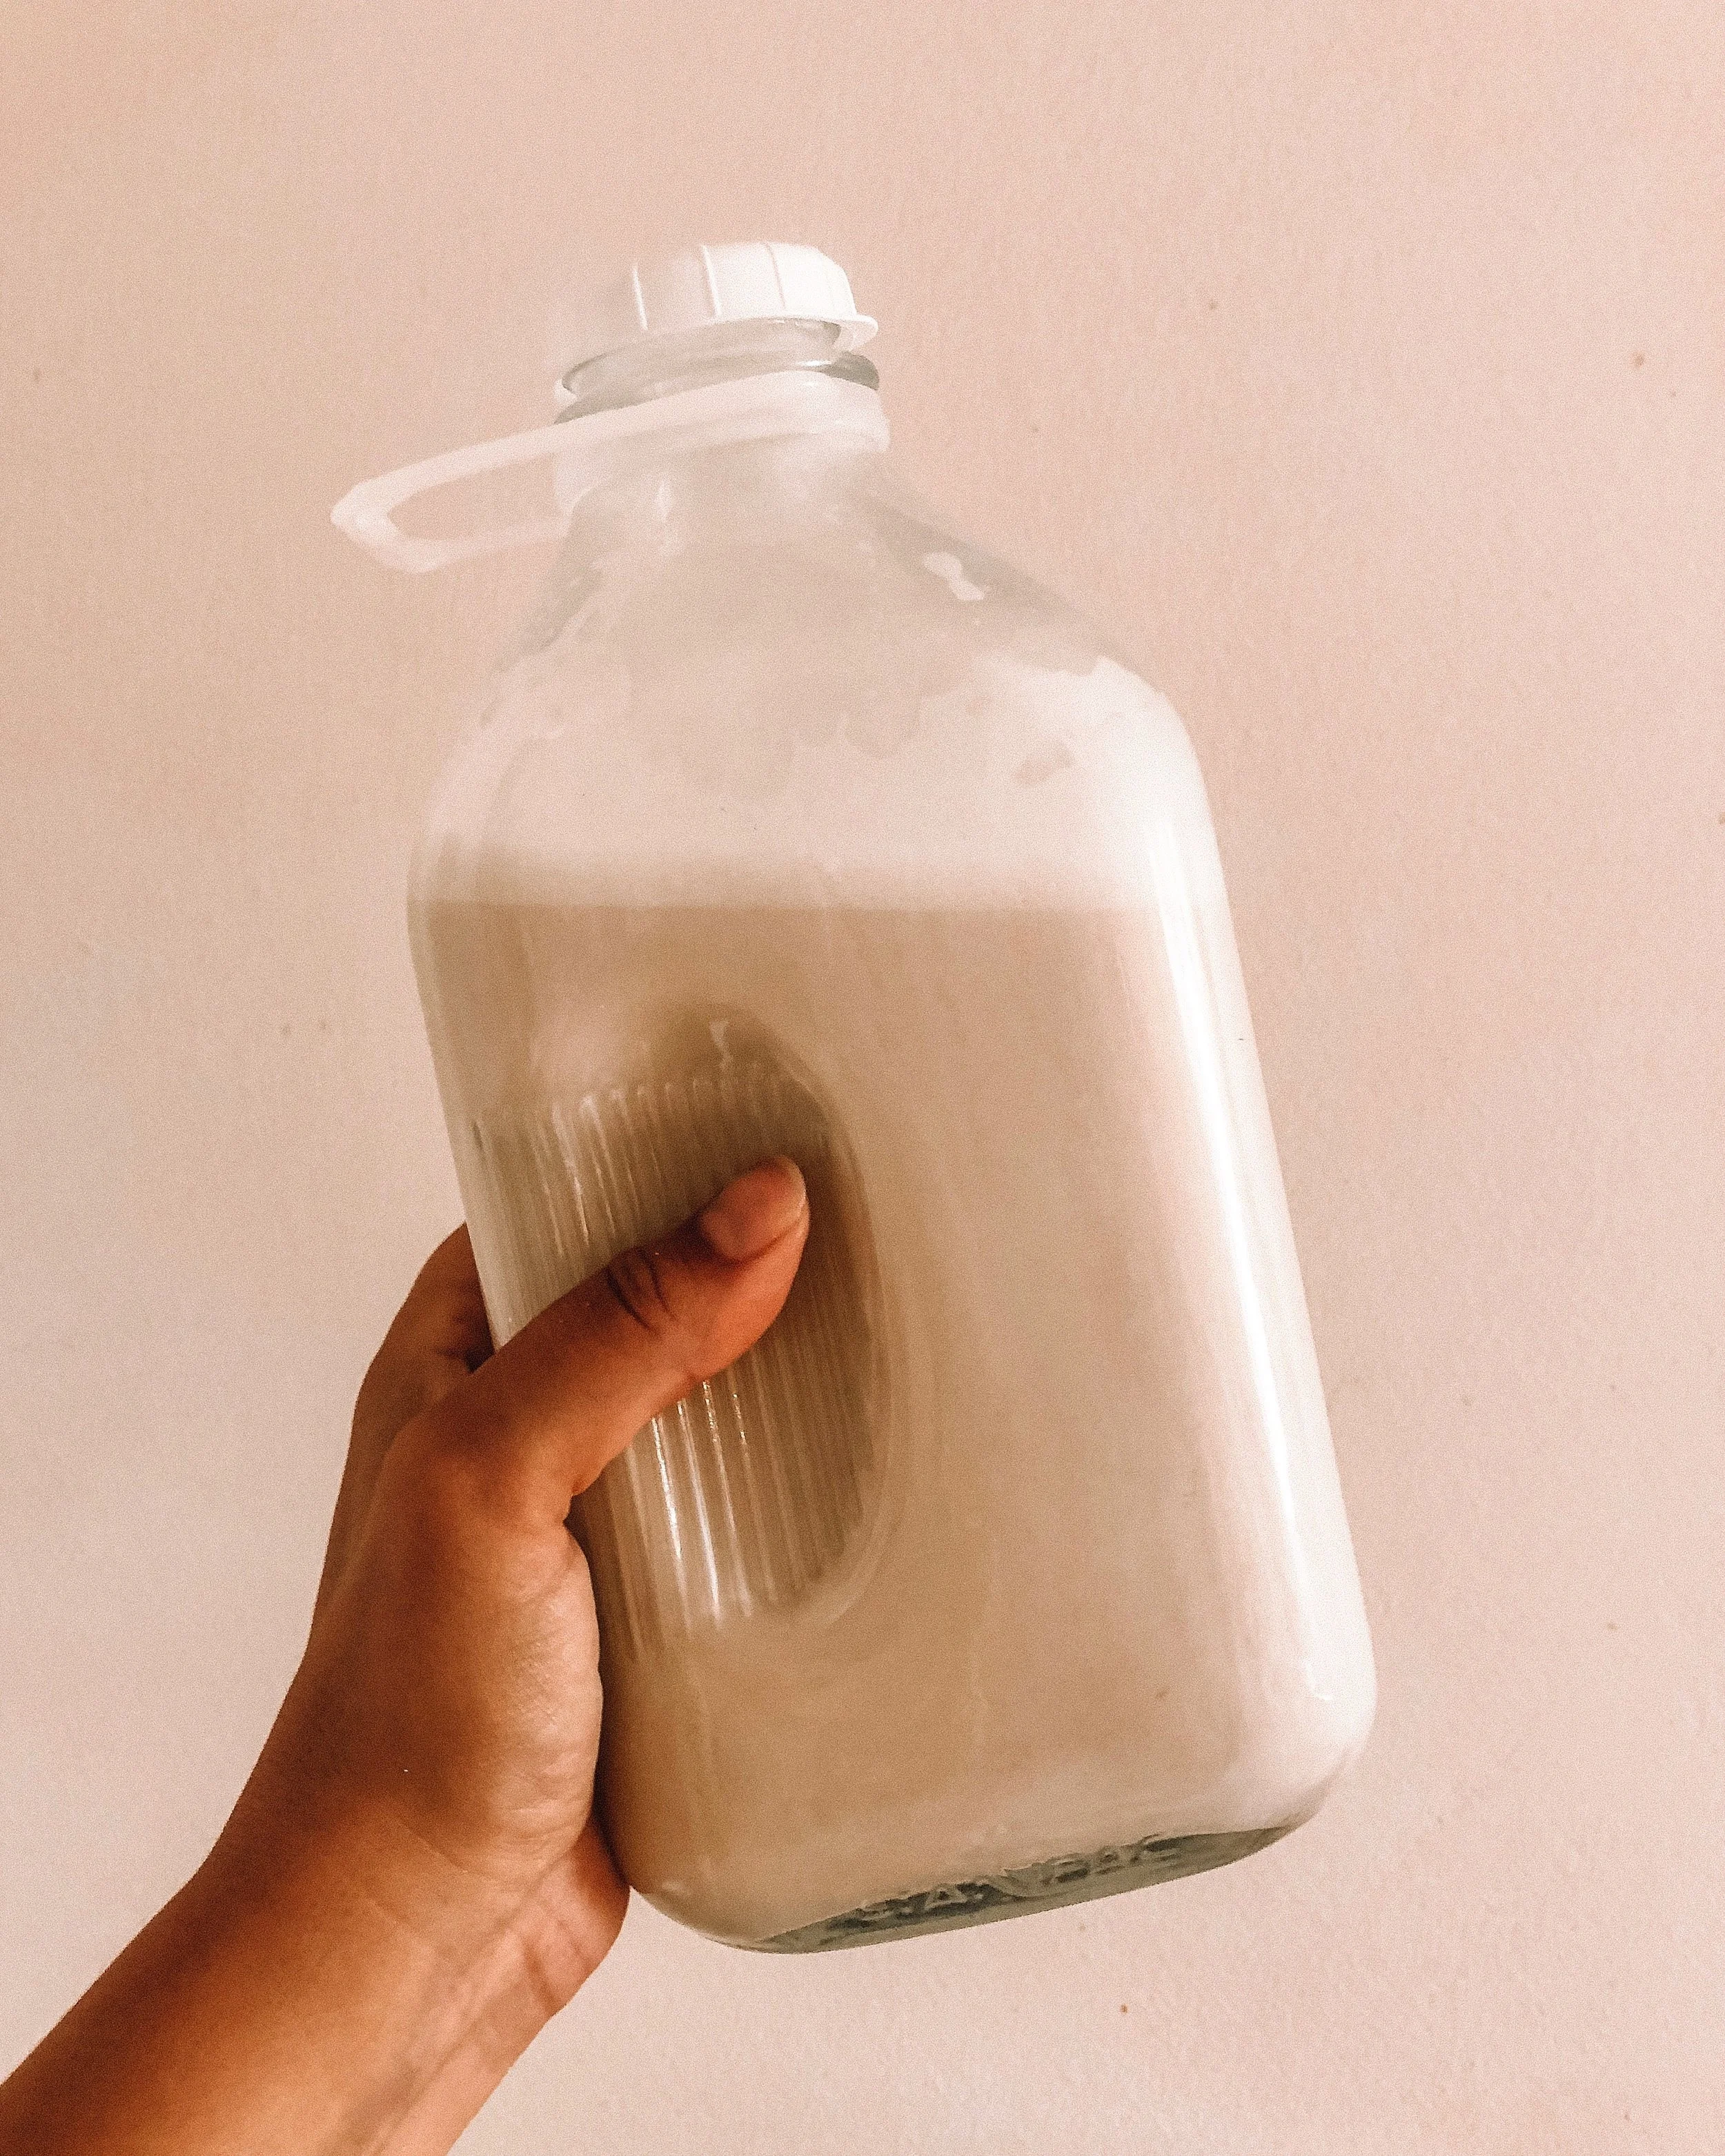
  3. Almond Flour: I make my own almond flour from the process of making my own almond milk. If you want to see how I do that, CLICK HERE!

  4. Oat Flour: This is another common gluten-free flour that you find in a lot of recipes, so I like to keep it on hand.

  5. Oats: I always have either GF regular oats or quick cooking steel cut oats on hand because I eat oatmeal so often for breakfast. It will always be my go-to breakfast because I love it so much.

  6. Diced Tomatoes: These can be used in so many different styles of cuisines so I always keep them on hand. They are perfect for a super quick tomato sauce too.

  7. Tomato Paste: I love keeping tubes of tomato paste on hand (usually from Trader Joe’s) because they can add an extra dimension of flavor to so many meals. I also need it for homemade tomato sauce, so….duh!

  8. Tubes of Ginger Paste: I love the Trader Joe’s tubes of minced ginger because then you don’t have a knob of ginger going bad in your fridge when you only need a tiny piece for a recipe. I love to season soups, bowls, chicken, etc, with a ginger/garlic combo.

  9. Broths (Veg and Chicken): I loooove to make soups, so these are an obvious must have. I only use chicken and veggie broth in my home so that’s all I stock. I always buy low sodium broths so I can control the salt level.

  10. Great Northern Beans: These are one of my favorite soup beans.

  11. Black Beans: A necessary for any Chipotle inspired burrito bowl or mexican inspired dish.

  12. Kidney Beans: I love how big kidney beans are so they really bulk up a meal.

  13. Nori Sheets: Great for sushi bowls and for making homemade miso soup.

  14. Almond Butter/Peanut Butter: I like to freshly grind mine at my grocery store and choose whatever I’m in the mood for.

  15. Coconut Sugar: I use coconut sugar in place of regular granulated or brown sugar whenever I can. I use it as my sweetener for my oatmeal too.

  16. Chia Seeds: I put chia seeds in my smoothies and in my oatmeal.

  17. Flax Seeds: I put flax in every smoothie I make (technically I store these in the fridge).

  18. Hemp Seeds: These also go in my oatmeal.

  19. Chocolate Chips: I keep them for obvious reasons, but I love to snack on 5-10 when I have a sweet tooth at night.

  20. Arrowroot Powder: I use this in place of cornstarch as a thickening agent, but it’s also found in a lot of GF recipes.

  21. Almonds: I make my own almond milk so I always have a big Costco bag of these on hand.

  22. Salsa Verde (specifically from Trader Joe’s): I love to keep salsa on hand for an easy snack, but I also love pouring a jar over chicken breasts in the crockpot for an easy dinner.

  23. Tomato Sauce (canned): I only keep the little cans of this on hand for when I make Chicken Tikka Masala.

  24. Dry Red Wine: This is my preference when it comes to drinking wine, but I also like to have it on hand to add to the base of my tomato sauces. It adds such a richness to your tomato sauce.

  25. Rice Paper Sheets: These are a quick easy dinner or lunch if you have lots of veggies on hand to use up. You can simply wet them and make spring rolls in no time at all.

  26. Konjac Noodles: These are a new favorite of mine. They are almost calorie-less, gluten-free and I really like the texture. They are not as sticky as a rice noodle and have a little bit more of a bite, so I prefer them to rice noodles.

  27. Red Lentil/ Other Gluten Free Pastas: Pasta will always be my go-to easiest meal to make for dinner, so I like to keep some good GF options on hand. I love red lentil pasta the most, but chickpea is also tasty!

  28. Lentils: These are an easy way to bulk up a soup, so I love having a big jar of them to throw in vegetarian soup.

  29. Polenta: Another GF alternative to eating a wheat product with your meal. The Italian in me wishes I could easy cheesy polenta every night.

If you made it to the end of this, GREAT JOB! I hope you enjoyed getting a peak into my pantry. What are your staples? If it’s not on my list, tell me what it is!

Have a beautiful day,

Andrea
The Routines I Use to Minimize My Anxiety

If you've been following me for a while, you probably know that I have anxiety. I’ve had it ever since I was a kid, and share my story on IG and on here every so often. I think talking about mental health on my blog is really important for two main reasons. First, it is very therapeutic for me to process my anxiety and really reflect on it by writing and constructing thoughts that make sense. The second reason is that it shows my readers that if they are dealing with similar situations, they are not alone. I cannot tell you how much it means when I get messages from you telling me how much they understand what I’m going through and how grateful they are for me sharing my story because they can relate to it.

It has been no secret that I have been really struggling with my anxiety in the last two months. It’s probably the worst that it has ever been, but I feel like I’m finally turning the corner. While I know that anxiety is something that I will likely have to deal with for the rest of my life, there are definitely moments of highs and lows. My goal with this post is to share what has helped me in the last few weeks in hopes that it will help even one reader. Even if you already know everything I’m writing, I hope you just recognize that this is something I deal with. I don’t ever, for even one moment, want you to think my life is completely put together and stress-free. I want you to recognize me as a safe space and open person who’s willing to talk to you if you need it.

  1. Find your person to vent to.

    I find that when I’m anxious, I need to word vomit everything out of me, as if to hear out loud what I’m thinking, recognize it as completely irrational and not true, and call it what it is; my anxiety talking. Whether you say it out loud to someone, or you write it out, I think finding someone that is a safe space to say things is important. Knowing that they won’t hold it against you, the thoughts you need to get out in the moment, is a great feeling. For me this person has been my boyfriend, but it can be anyone you feel like you can trust.

  2. Eat a good breakfast.

    What I eat really affects my thoughts when I’m anxious, so I always make sure to not skip breakfast because it starts my day off on the right foot. When I have a good breakfast, I seem to make healthier choices throughout the rest of the day in regards to my diet, and it’s crazy how much what I eat can affect my mood.

  3. Move your body everyday.

    When I hurt my tailbone and had to drop my entire workout regimen, my anxiety skyrocketed. I knew that I needed to rest and let my body heal, but it really messed with my head. You don’t have to have intense workouts every day, but focusing on moving my body every day is really important for me to lessen my anxiety. Now that my injury is healed, I am working out almost every day (some days it’s just a walk though so don’t be intimidated) and it’s the thing that I think is helping me the most to get back on track.

  4. Get more sleep.

    I have been sleeping so well ironically through this time of anxiety and I think it’s because I’m emotionally exhausted at the end of the day. Allowing myself to say, “I’m tired…I need to go to bed early tonight” has been really important in this journey. However, my anxiety seems to strike midday from about 11 am to 5 pm, so I think this also might be why. I usually wake up less anxious and go to bed the same way, but this could be different for you. My point is to really push yourself to get the rest your body needs during this time.

  5. Make a list of happy activities.

    This is something I find really useful for days when I am really struggling. I have a list of activities that make me really happy, that lives in my purse. These are things I can easily do so that if I feel anxiety growing, I can pull the list out, pick an activity and shift my focus somewhere else. My list has things like watch my favorite Netflix show, read a book, call a family member or friend, do yoga, or cook a meal. I typically carry a book with me always because I love escaping into a good story for a moment, but regardless of what your happy activities are, writing them out really helps you in the moment when you can read it.

  6. Re-evaluate your goals.

    In the last few months, I’ve had to reevaluate my goals and decide what’s important in this time when I’m going through some tougher times. It’s ok to say, I don’t have the mental capacity for this right now, and make it a goal for later on. I know it can feel defeating to do this sometimes, but your mental health needs to be a priority and that goal can wait.

  7. Work on setting boundaries.

    This one can be really hard and I am definitely working on it. I’m proud of excusing myself from conversations and just flat out saying no to things that I can’t entertain while I’m working on myself right now. You are allowed to say “I have too much on my plate right now”. You don’t have to explain yourself to people if you don’t want to. Those who love and support you will understand.

Overall, I hope this post helps you feel less alone if you are also dealing with anxiety or any mental health issue. Go follow my Instagram here if you are wanting to read more about my posts on my anxiety. This is a topic that I will continue to talk about and I hope you know how loved and beautiful you are.

Have a beautiful day,

Andrea

How to Cook More (Part 2)

A little over a year ago, I wrote a post called “How to Cook More” and you guys really loved it. Click here to read that one first and learn the inspiration behind it.

I wanted to write a follow up post because as I’m writing my cookbook, I’m thinking a lot about the topic of how to inspire people to get into their kitchens more. So I’m back with more ways to share with you on how to cook more. As usual, I love when these posts can be the start of a bigger conversation, so be sure to comment below and let me know what really got you into cooking.

Reminder, if you want to get on my cookbook list and be the first to learn all about it, click here.

Start with one-pot recipes.

I often find that the kitchen can be very overwhelming for people and for most of us, the worst part about cooking is all the huge mess we can make. Also the thought of having to manage multiple burners or things in the oven can be stressful. To that I say, start with one-pot meals. Whether it’s an entire cookbook you purchase on one-pot meals, or you search it on Pinterest, getting your feet wet with simple recipes will help you see that you CAN do it. Then once you feel comfortable, you can dive into dishes with a little more complexity and learn new skills.

Clean as you go.

To go off of the last topic, the mess created from cooking a meal can deter you from starting in the first place. So often we create this huge mess and at the end think, '“well that wasn’t worth it'…” and never make the recipe again. Be strict with yourself and anytime you have 3 minutes or so, wash a dish or two that you are no longer using. This way, when the meal is done, all you have to clean is the dishware you ate on and maybe a pot or serving bowl. If you deal with anxiety you may also find cooking less challenging if the environment you are doing it in is tidy and calm.

Start small.

Sometimes when we make goals we are all or nothing. We go all out and eventually get burnt out, so I suggest instead of saying, “I’m going to cook dinner every night this week and no take out'“, challenge yourself to cooking just one or two nights during the week instead. Once you create that habit, you can increase the amount of cooking you do, little by little.

Start by learning how to make your favorite foods.

If learning how to make your favorite foods at home isn’t a source of inspiration, then I don’t know what is! I think we often think that we have to learn how to cook only healthy meals, but if you’re just getting started in the kitchen, learning how to make your favorite foods will help you become confident and really enjoy the experience. I often challenge myself to try tons of recipes for that one meal until I find my favorite.

Invite people over to eat.

Sometimes if we live alone or with our significant other, it can seem like a lot of work to cook for a small amount of people. Invite some friends over and give meaning to the meal you are preparing. Cooking for the people I love is my favorite thing to do and you might find that you really enjoy it too! Maybe vow to yourself that you want to start hosting small dinners for friend’s birthdays or even just because it’s Friday and you made it through another week! Whatever the occasion, sharing the fruits of your labor can be a great source of inspiration for getting in the kitchen to do the work.

If you’re curious what cookbooks I love, click this link and you can see all of my posts relating to cookbooks I have and why I love them (including my Cookbook Gift Guide from December)!

Remember, cooking is a fun way to express your creativity. If you mess up, you can always try again tomorrow!

Have a beautiful day,

Andrea

How I Whiten My Teeth At Home

Today I’m back with a post that I’m really excited to be sharing. There’s even something exciting for my readers at the end so make sure to read through! 

As many of you know, I quit drinking coffee on a regular basis a few months ago. I have always loved my smile, but in the last few years I had noticed how my coffee habit was affecting the color of my teeth. I figured that since I’ve kicked the caffeine habit, now was the time to look into whitening my smile, as it would be easier to maintain without the daily coffee consumption.  

It’s funny how life works, but after spending a little time researching at home teeth whitening, I opened my email inbox to a message from Smile Brilliant wanting to do a collaboration! If that wasn’t a sign, I don’t know what is. 

I was excited to work with Smile Brilliant because they wanted to send me a teeth whitening system and share my honest feelings with you guys about the process. Now this is not a sponsored post but I did receive the teeth whitening system for free. However, my opinions on it are completely my own and I hope you already know that I would never recommend a product I didn’t like! 

image2.jpeg

I know that a lot of you reading this are getting ready to celebrate either your own special events, like your wedding, or have many close friends and family members celebrating special events and you want to look your best for them all. If your schedule looks anything like mine these days, there are photo ops every month.  

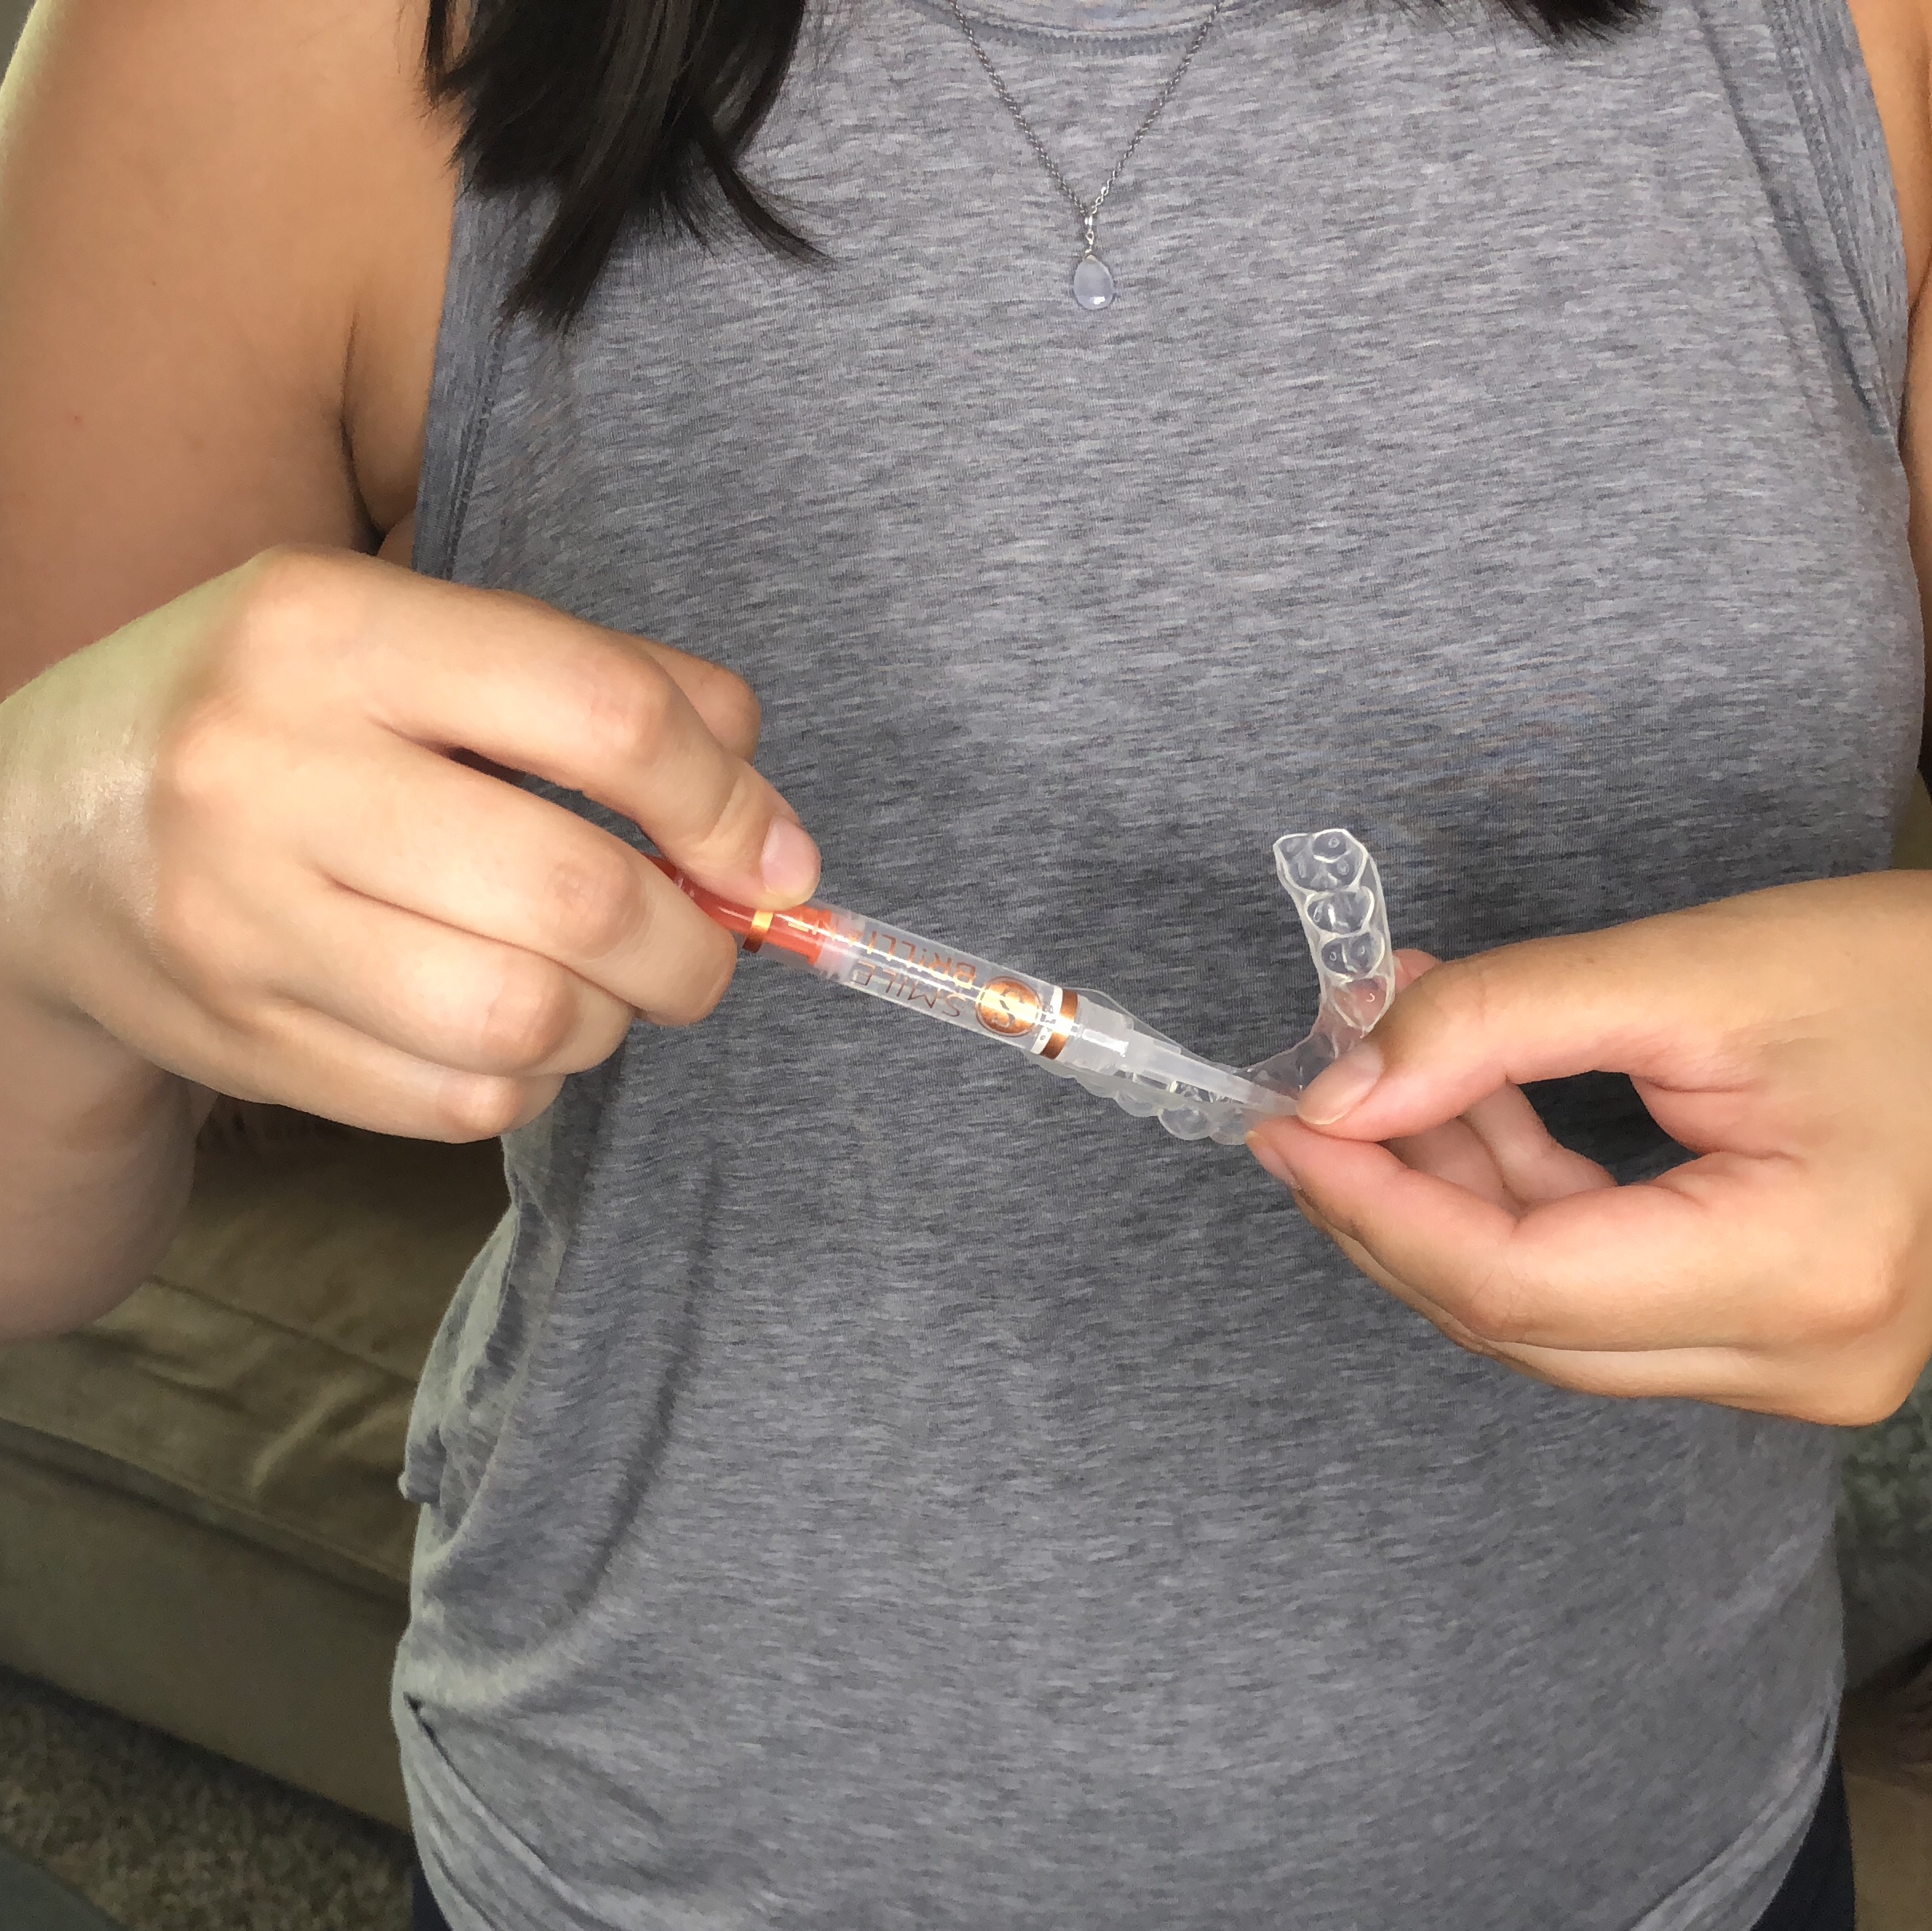
I was excited to try out Smile Brilliant because it’s a professional whitening system that you do at home, yet is still really customized and effective. Not only that, it’s REALLY easy to use. No awkward lights to put in your mouth; just custom trays that fit perfectly and you can go about your activities while whitening. I had only ever used Crest Whitestrips in the past, which were easy but took a lot longer to see results; plus I always experienced sensitivity. Smile Brilliant has a few different system options, and I chose sensitive which has really helped me not feel any side effects in my day to day life while whitening. One thing that is really great about Smile Brilliant is that if you are not happy with your results they will give you a full refund! Click here to visit their website and get even MORE info on the whitening systems! 

When you get your kit in the mail, the first step is to make your impressions so that your trays fit perfectly. The kit comes with very detailed instructions for the whole process. Once you make your impressions, you pop them in a pre-paid envelope and send them back to Smile Brilliant so they can make your trays. This whole process was pretty quick too, which I liked because I was excited to get started! 


image1.jpeg

Once you start the whitening process, it’s simple. 

  1. Brush your teeth with water. 

  2. Fill your trays with the whitening gel and leave in your mouth for 45 minutes up to 3 hours.  

  3. Brush your teeth like normal (including brushing out your trays). 

  4. If you’re doing the sensitive version, you add the desensitizing gel to the trays, leave on for 15-20 minutes and then don’t drink any liquids for at least an hour. 

image1 - Copy.jpeg

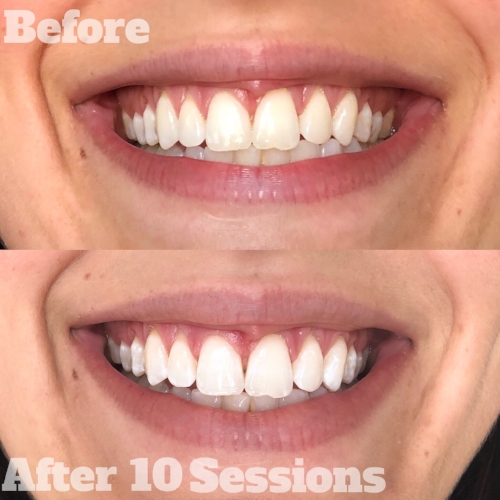
It takes anywhere from 7-14 sessions to get your teeth where you want them, and they send plenty of product! Now I’m sure you’re really curious about my thoughts. Below are some photos of my before and after and then we’ll get into the pros and cons of using Smile Brilliant. 

Let’s talk about the cons first. The thing I found most challenging about using the whitening trays was that I had to plan out my life accordingly. I preferred to whiten at night after dinner, but then I couldn’t drink water before bed which was kind of annoying. Sometimes I simply get home too later and need to sleep and don’t have time to whiten so I would have to skip a day or two before I could get back on schedule.  

The only other big con was that I did notice some sensitivity with my gums. Now most of this is probably due to the fact that my labial frenum (google it) on the top of my mouth was supposed to be clipped when I was younger and they never ended up doing it. So this means that it is attached lower than it is supposed to be and the trays really felt too tall for my mouth and scratched up against this. Again, this is more so my fault, not Smile Brilliant’s, but I have to say that I received lots of tips and help from Sierra over at Smile Brilliant, with how to increase my comfort level. I ended up coating my gums in coconut oil before hand and trying not to talk or move my mouth much while whitening. I also decided to whiten every other day, which helped cut back on irritation and I don’t think it skewed my results. If you end up trying this system out, I highly recommend the coconut oil on your gums for decreasing sensitivity! Works great! 

Now let’s talk about the PROS! I cannot believe how quickly this system worked. I noticed my teeth being whiter after one use, but ended up doing 10 sessions. Plus I still have whitening gel that I’m going to keep for touch ups before my sister’s wedding this fall! I loved that the trays were customized and molded to my teeth because having a tray in your mouth for over an hour that is big and doesn’t fit would be super annoying. One big thing I loved too was that even if I accidently got some gel in my mouth, it didn’t taste TERRIBLE. I had a bad experience once....can you tell? Haha  

I’m really excited to enter the fall season of weddings and events that I have being more confident in my smile. I think we can all agree that a whiter smile makes us feel more confident as we go about our daily business. As a makeup artist I am always taking pictures of my own face to share makeup looks, meeting new clients, and even taking photos with my brides. I am happy now that my smile is free of the coffee stains and would highly recommend you give Smile Brilliant a look if you are looking for teeth whitening.  

Here’s what my teeth looked like before and after 10 uses of the Smile Brilliant Sensitive Whitening System.  

These photos have not been filtered and have had absolutely no retouching. These ARE MY TEETH!

These photos have not been filtered and have had absolutely no retouching. These ARE MY TEETH!

Now for the exciting part! I am doing to be doing a giveaway with Smile Brilliant that will allow one of my amazing readers to win a whitening system of their own! Click the link below to enter the giveaway that is being hosted on their website for all of you! Good luck!! 

CLICK HERE TO ENTER GIVEAWAY! (Giveaway close one week from today - September 3rd

You can also use the code andreafontanabeauty15 to recieve 15% off store wide at Smile Brilliant!

Please be sure to message me or leave me comment below if you have questions about the Smile Brilliant at home whitening system. Also let me know if you try it out for yourself and what you think about it! I’m excited to have been able to share something like this with you guys.  

Have a beautiful weekend, 

Andrea

My 'Party's Over' Detox Skin Tips

Welcome back! If you don't follow me on Instagram (...but like why aren't you?) then you wouldn't know that I spent 5 days last week in Chicago working a wedding and then frolicking with friends in the city. This meant more gluten than I normally eat, little sleep, wine instead of water, and all sorts of anti-clear skin habits. Am I paying for it? You betcha. Was it worth it? HELL YES! Because spending quality time with my best friends is priceless and I have the tricks to get my skin back to where I want it once the party's over. 

Today I'm sharing what I've been doing to get my skin back to where I want it & my body feeling normal again. These are my "Party's Over" Detox Skin Tips. Whether you're back from vacation or just celebrated your birthday week (...or month haha) I hope you find these tips helpful to getting back on track with your skin & body.

1. Get rid of all the guilt. Do not spend one second stressed about the fact that you had 2 donuts instead of 1. We've all been there. We've all done it. But that's the point. It's done and all you can do is accept that you cannot change it and get back on track now.

2. Cut out your trigger foods for a week. The first thing I had to do when I got back was get back to eating gluten-free every meal. I usually had one or two meals with gluten when I was in Chicago and since it affects my skin so much, I have cut them out for a week to boost my clear skin and feel better. Whatever your trigger food may be, skip it for a few days or a week and it'll help you to start feeling like yourself again.

3. Do an At Home Detox Facial: Chances are you were a little more lax with your skincare routine when on vacation so it's time to get your skin back into shape. This is especially important for me because my diet caused some serious texture issues and breakouts. I cannot recommend this enough. Here's how I do it.

  1. Start by cleansing your face & toning. I'm currently using this Juice Beauty Green Apple Brightening Gel Cleanser, but if you don't have it try to go for one with a gentle chemical exfoliation to help get rid of any congestion. This cleanser was in my July Favorites; click here to read why I liked it. 
  2. 1st Mask: Chemical exfoliation; I like the Herbivore Botanicals Blue Tansy Mask because it's great for blemishes. Leave on for 15-20 min until dry and wash off & tone again.
  3. 2nd Mask: Detox and clarifying; I prefer the Aztec Healing Bentonite Clay because it boosts circulation and detoxifies so well! Click here to read my post on this mask. The clay comes as powder and I like to mix it with apple cider vinegar or water and add a few drops of tea tree oil until it forms a thin paste. I apply it and leave it on for 30-45 min depending on how long it takes to dry/how long I can handle it. It tingles! Rinse and tone again.
  4. 3rd Mask: Hydrate & Nourish; I love the Farmacy Honey Potion Renewing Anti-Oxidant Hydration Mask to hydrate and heal my skin after I've neglected it. It warms on contact and is such a comforting and nourishing experience. Leave this one on for about 15 minutes and have a cup of tea. Rinse off, tone, and apply your normal spot treatments & serums. 
  5. Lastly it's time to re-hydrate your skin due to your preference of wine over water. I like to throw on my Laneige Water Sleeping Mask in place of my moisturizer so I can really benefit from all the hyaluronic acid and feel hydrated when I wake up.

4. Try reducing your caffeine intake. I know what you're probably thinking. Wait, I need MORE coffee to recover from a great time than less, but trust me. Your skin and your body will adapt better with less caffeine. Try sleeping more instead! Crazy I know...

Go ahead bookmark this post for easy access next time you have a girls night out, staycation, or simply need weekend recovery. If you're like me, you're not 21 anymore and can use the tips to getting back on track. Maybe you'll feel a little less stressed about skipping your routine when it's time to simply have fun!

Have a great week,

Andrea

Tips for Practicing REAL Self Care

I realized recently that I haven't shared a topic on here that I talk about a lot in my non-blog life. I am just going to come out and say that I hate the phrase 'Self Care'. It's not so much the term that I hate but the trend that it has become in today's world. Stay with me. I think that taking time to yourself is crucial, but let me explain why I feel this way.

I find that the phrase 'self care' has become a trendy word for procrastination and a gold mine for the marketing of products to us. 'Practice self care and buy this bath bomb...you deserve it.' I know you've seen these campaigns and messages and frankly it frustrates the crap out of me. Taking a bubble bath is really great but if you have several things that you need to get done that night, a bubble bath can wait until tomorrow. However, if labeled as a 'self care' moment, it's fine to push off your priorities. 

If we are so stressed that we need to take a break and pause for a minute to take a bubble bath, I believe true self care is figuring out what is causing these moments of burning out and readjusting your life so it doesn't keep happening. It's crazy to keep doing the same things and expecting life to get easier if we don't self reflect and make some changes. There are no products that are going to fix the unbalanced life we are living, so today I'm offering you some tips to truly practice REAL self care and dig deeper into the stress of our lives. Use self care to really change your lifestyle so you can set yourself up for success and reduce stress and anxiety. 

Please be sure to comment below with your thoughts on the 'self care' trend and whether you agree or disagree with me.

6 questions to ask yourself to practice REAL self care:

1. What is one area of my house that I can tidy to relieve some anxiety? I am a huge believer in the idea that if your environment is messy, you will feel more anxious. Is there one space that you look at day in and day out, that could be tidier? Spend some time tackling it and I guarantee it will make your home more pleasant. 

2. What is the one thing on my To-Do list that would relieve some stress if I just did it? We all have those things on our lists that are either tedious tasks or simply no fun, but need to get done. Recognize this task as being annoying and just do it. Think about how relieved you will feel when it's done and carry that thought with you through the process to motivate you to complete it.

3. What is one thing that I don't want to think about right now but need to? This could be in many different categories of life. Sometimes we push things off or put them on the back burner because we don't want to think about them, but acknowledging them can take a huge weight off our chests. Debt is a great example of this. If you have no idea how much you owe in student loans, car loans, etc....ADD IT UP! The scariest part is looking at that total number, but once you do it, you can create a plan to get rid of it. 

4. How would I feel if I didn't let these anxious thoughts affect me? Sometimes we need to practice self care because we can't get out of our own heads. Trust me, I'm right there with you. But if we take a moment to think about how we would feel if we didn't let the stress and anxiety affect us, we give the anxiety less power and it's easier to think through it. Really try to think about the actual emotions you could be feeling instead.

5. Who can I call to just listen to me work through this stress and anxiety? Something that is really helpful for me to do is to talk to a close friend about whatever is bothering me. Venting in a sense and getting it all out, can be all we really need to feeling better. Sometimes it's helpful to hear someone say yes this is stressful and it's okay to feel this way. For me however, I like doing this because often it's helpful to have my best friend say what's the worst that could happen. 

6. Do I have a habit that I don't like and what can I do to stop it? Sometimes we don't realize the habits that we have created unless we measure them. I recommend to friends all the time to track what they spend their time doing and what the pros & cons are for each activity. If you don't like the habits you see, work to get rid of them! If it's a pretty big habit, look for support in your community to break it! 

Overall these questions encourage self reflection which I am HUGE on! I talk about it all the time with people because I believe it is so important to make changes when it's necessary and redirect what we are doing on a daily basis. I hope these questions encourage you to practice REAL self care and change your lifestyle for the better instead of supressing it with another bath bomb.  

Have a beautiful day,

Andrea


How I make Almond Milk/Flour:

This post has been so highly requested and I'm happy to finally write it for you. After doing my elimination diet a few months ago and feeling what it felt like to be eating 100% unprocessed, I was hooked. I've always had the belief that life is about balance in many aspects. I would never want to deprive myself of the foods I love but also think there is an alternative to eating heavily processed treats. I have kind of always operated on the idea that if I can make it myself I'm allowed to eat it.

IMG_4222.JPG

Almond milk isn't necessarily bad for you, but when you buy it in the stores it unfortunately has to have stabilizers and other ingredients that keep it fresh for you to enjoy at home. Making almond milk eliminates all of this processing and tastes SO MUCH BETTER. Plus, since going gluten free I like to have almond meal (aka flour) on hand and it's expensive! Making your own almond milk yields the milk, but also about 1 cup of almond pulp that you can easily turn into meal! This means it's a zero waste process and will save you money, especially if you use almond meal on a regular basis! Today I'm going to take you through how I make my almond milk and turn the pulp into meal!

First let's go over what you will need for this process:
- 1 cup of almonds (I buy mine in a big bag at Costco)
- 7 cups of water
- Vanilla or salt if wanted
- High speed blender or food processor (I use a ninja) --> Here's the one I have and LOVE (Side note: I took FOREVER to decide on a blender and this is the one I went with. I've had it for over a year and use it constantly. I can't recommend it enough if you're looking for a high quality blender but don't want to shell out the money for a Vitamix)
- Glass container to store milk up to 3 or 4 days --> I purchased this one from Amazon
- Nut Milk Bag --> I purchased this Nylon 2-pack from Amazon.

1. You'll need to soak the almonds for at least 4 hours (I usually just do it overnight) in order to soften them and make them easy to blend.

2. Empty the water that the almonds have been soaking in and add the cup of softened almonds, 7 cups of water and a splash of vanilla and sprinkle of salt to the blender. I have made it with no salt and vanilla and it was great too! Choice is up to you. If you're used to unsweetened original almond milk, leave it out!

3. Blend for 2 minutes on a high speed.

4. Pour your blended mixture through the nut bag into a bowl and squeeze all of the liquid out with your hands! I love the nylon ones I purchased from Amazon because they are super easy to hand wash and keep clean (I also use them to strain my kombucha!)

5. Store in your glass container for up to 4 days!

YES It's really that easy! Now for the almond meal:

1. Preheat your oven to 100 or 150 degrees.

2. Spread your almond pulp onto a baking sheet and break up all of the clumps with your fingers. The more liquid you squeeze out the easier this will be.

3. Bake for 1-1.5 hours until the almond meal is dry, checking on it every 15-20 min to make sure it's drying out evenly. 

4. If your blender hasn't ground it fine enough, you can put it back through the food processor, blender or even a coffee grinder to make it finer!


One of the cool things about making your own almond milk is that you can flavor it however you want! I cannot wait to add turmeric, cinnamon, and more to my almond milk in the fall to make yummy drinks (Thanks for the suggestion Detroit Wifestyles!) 

Have you ever made your own nut milk? What kinds of combinations do you do? Leave a comment below and let me know!

As always, have a beautiful day!

-Andrea

Disclosure: Amazon links are Amazon Affiliate links meaning that I make a commission off the purchase of the product through my link. I would never recommend a product that I didn't love and all opinions are my own. I am thankful for you choosing to purchase through my links, as it helps me create more content for Andrea Fontana Beauty.

My Elimination Diet Experience

If you follow me on Instagram you might have seen that during April and May I underwent an elimination diet to figure out which foods were bothering me. A lot of you were interested in the process and results so I figured I would share a little bit about my history that led me to do this type of diet, what it was like, and what I discovered about my digestive health. 

*Disclaimer: Always check with your doctor before starting an elimination diet or any type of diet. I am not a nutritionist and this post is meant only to share my experience with you guys! 

Background:
First let's talk about my history. A little over 10 years ago, while visiting my family in Brazil, I ended up with a twisted intestine. They were able to fix it there but when I came back to the U.S. I ended up having more pains. They did every test under the sun but weren't able to diagnose anything else. Since my twisted intestine, I have had a love hate relationship with my digestive system. Many foods continued to make me sick and surprise, surprise, more tests came and no answers were discovered. I finally decided to play with my diet and take out the foods that made me sick. 

For the past 10 years, I've been vegetarian 80% of the time because meat has just never settled well for me. I would go through phases of eating no meat and then slowly phasing it back in, but my symptoms always came back. I wake up with symptoms at 3 am more than I'd like to admit and spend 60% of the time probably feeling bloated and looking 3 months pregnant. There's plenty more symptoms but in case you're reading this on your lunch break, I'll spare you the details. I have medicine that I was given to help my intestines not spasm so much, but the thought of living my life taking pills in order to eat certain foods just didn't feel like the life I wanted to live. After talking to my doctor a earlier this year we decided I needed to try more probiotics (I started making my own kombucha which I LOVE) and changing my diet up.

My Elimination Diet:
In the beginning of April, a friend texted me and asked if I wanted to do an elimination diet with her and be accountability partners. I had always told myself that I should try one, like the Whole 30, etc, but had never just bit the bullet and done it. The one we did was based off the book 'The Elimination Diet: Discover the Foods that are Making You Sick and Tired --and Feel Better Fast' by Tom Malterre & Alissa Segersten, which is a little bit different than the Whole 30. If you're interested I highly recommend buying the book and going off of that and checking with your doctor first. 

Elimination Phase:
For the first 3 weeks I eliminated the following; beef, pork, citrus, nightshades (tomatoes, potatoes, peppers, etc.), soy, corn, gluten, added sugar, nuts, alcohol, chocolate, & dairy. Basically when people would ask what I couldn't have it was easier to tell them what I could eat because that list was shorter! haha I also eliminated caffeine because I knew it has an effect on my digestive system and I didn't want it to skew the results. I used to drink one cup of coffee every morning and a few afternoons a week, so this was a difficult change for me. 

The first three weeks were tough. I craved foods I didn't even really like that much and had never craved before. I had terrible headaches for the first 4 days because of the caffeine withdrawals. The good news though, is that I never felt hungry. I was eating so many fruits and vegetables and foods that were nutritionally dense, but not calorie dense, so I felt great! It was crazy to see how quickly I felt like my stomach shrank in half and I was full quicker. The three weeks honestly went quicker than I expected once I got used to the foods I could and couldn't have. I was basically eating extremely clean and unprocessed and it felt great! I had energy after my meals instead of feeling comatose and ALL of my symptoms went away. I had the best skin I've had in years, with no breakouts and I felt like I was glowing. The only drinks I was having was 2 cups of chamomile tea a day (in replacement of coffee) and SO much water. I'm usually great with water intake but this was even better! 

The one thing that was hard for me at first was that I felt like I lost my love for food for a few weeks. If you've been following my blog or IG you know that I LOVE to cook. Food is my passion and I cook most of my meals almost every day. I found myself feeling like I was just eating for sustenance and not for enjoyment which was hard when you love creating meals. Eventually I got over this feeling though, when I started looking at cooking in a different way. I started challenging myself to create my favorite meals using substitutes and cooking became fun again!

The Reintroduction Phase: 
After the three weeks are up, you start adding one type of food in for 3 days to see what your body's response is. If you pass and have no symptoms, you get to keep it in your diet and move onto the next food. If you don't pass it, you have to wait for your body to clear the upsetting food and remove it again but continue on. The book is great at outlining the order and way that you should introduce the foods so again I highly recommend checking it out so you can do the process properly. 

The Results & Where I'm at Now:
So what did I discover? Beef and pork are in fact triggers for me. When I did three days of each back to back, I was so lethargic and exhausted that I knew it was a sign that my body didn't like them. Going into this I had a feeling it wasn't just these two however, so I wasn't surprised to see that I didn't have my normal symptoms from them. I knew there had to be something else.

Enter in testing gluten. When the time came to test, I had something with gluten for dinner and the next morning all of my symptoms were back. The same thing kept happening over the course of more gluten meals. The interesting part I found was that I broke out terribly on the third day and it just kept happening with more gluten. 

So where am I at now? I eat a gluten free diet with no beef or pork. Even though I didn't end up with symptoms when testing dairy, I still try to eat a very minimal amount (I am so thankful I can still have my ice cream cones this summer), because I have noticed in the past how it can affect my skin. I still haven't gone back to caffeine on a regular basis and I honestly don't know if I'll go back anytime soon. I have only had 2 cups of coffee since I started 2 months ago and will drink an occasional green tea if I feel like I need it. I'm sleeping better and even lost 14 pounds during the process which wasn't intentional but I was happy about! My anxiety was also much lower during this process which I found really interesting. 

The thing I am most proud of however is that I was able to practice self control and accomplish something so difficult! I promise you it’s worth it in the end to so! You will feel great about yourself!  

My Recommendations:
I highly recommend that you do more research and talk to your doctor if this sounds any bit intriguing to you. I think everyone should try this diet at least once because it's very eye opening. I felt like I was finally living without the fog when I was eating clean and unprocessed. Sometimes you don't realize how negatively something can be impacting you until you remove it. Here are some things to remember if you want to try this out:

-Do this process with a friend. It was SO helpful to have someone I could text all the time and ask questions to, give feedback to, and just talk about how I was doing. It was interesting to see the similarities and differences between our symptoms. It also happened to work out that on days when I was feeling really low she was doing well and was able to pick me up, and vice versa. Support is EVERYTHING in these types of situations.

-Don't try this when you have many special events going on. The less temptations you have the easier it will be to stick to the diet and not stray. It's not fun to go to a wedding and not be able to eat the food, so plan accordingly.

-Meal plan and prep every week. This was huge for me and I really think it's the bulk of why I succeeded. I never questioned what I was going to eat next and always had many options available that I was excited about. The book contains many great recipes for all of the different phases so it was nice having some options and ideas. 

-Give your friends and family the heads up that you are doing this. If you let everyone close in your life know that you are doing this diet, they will be less likely to invite you out and tempt you into situations where you make bad food decisions.

-Plan on not eating out for awhile. The only times I found it difficult to find something to eat were when I had to eat out (i.e. I went out of town). Bring plenty of snacks wherever you go so that if this happens, you at least have some back up foods. 

I hope this over view of my Elimination Diet experience was helpful for you! Please feel free to comment below or email me with any questions you have. I love talking about it because it was such a positive experience for me. 

Have a beautiful day and don't forget to take your health seriously! We only get one shot!

Andrea


Science of Skincare (S.O.S. #4): Cleaning Up Your Skincare Routine

I'm going to warn you in advance that this post is going to be longer than normal. I am cleaning out my skincare and getting rid of the chemicals. This has been something that I have been thinking about doing for a long time. In the last few months I have been thinking about health, fitness, my diet, and more in a different way and that is what prompted me to think about the products I was using on my skin on a daily basis. I have always considered health to be a vital part of my skincare so I felt like this was a natural progression for me. 

With any big changes like this, you have to start small because it's too expensive to do every product I use right now at once. I didn't want to empty my entire medicine cabinet and skincare shelf into the trash so in this post I am going to share my process with cleaning up my skincare routine and my thoughts behind my decisions. If the thought of this is something you have been toying with, I highly suggest you grab a drink and snack and read this post thoroughly. I personally am starting with skincare because I use it twice a day, every day. Next I will move to hair products, and then my every day makeup routine. I say every day because I am not as concerned about a lipstick I wear once a year. I am the most concerned about the products I am applying to my skin every day so I will be focusing there first! So let's dive right in.

Let me start by giving you a little background on the ingredients that are used in skincare products. If you know me, you know that I am a huge label reader and recommend products based on their ingredients, not their brand names or claims. The reason you see such a large margin between high end and low end products, is because most ingredients can be synthetically made. Some skincare companies pay the money to source ingredients naturally, which you see reflected in the price tag. I feel like there is this misconception that you need chemicals in order to see results with skincare but this is not the case. There are so many naturally occurring acids, enzymes, antioxidants, and more that can be used to create amazing products that will be healthier for you and still give you great results. 

When I decided to embark on this journey I first turned to my favorite app called Think Dirty. You can also visit the EWG's Skin Deep Cosmetic Database here, if you want to do it on your computer. I had had the Think Dirty app on my phone for a long time, but was terrified to see just how bad the products I was using were, so I hadn't done much with it. In a nutshell, the app allows you to search or scan the bar code of almost 1 million different products and they rate them on a scale of 0 to 10; 0-3 being healthy for your skin, 4-7 being moderately bad for your skin, and 8-10 being the worst for you skin. Not only does it rate them, it allows you to look at why they get the rating they do. Each ingredient in the product is also rated so if it has a high rating it will show you the ingredients that are causing it to rate so high. It will then tell you the purpose of the ingredient and if it's linked to being carcinogenic, causing developmental & reproductive toxicity, or causing allergies & immunotoxicities. 

If a product wasn't listed in the app, which seems to be the case for a lot of newer products and brands, I would first submit the product to the app (a feature I love) and then I would hop on my computer and search ingredient by ingredient on the Skin Deep Database I mentioned above. Now I want to list some of the ingredients I am trying to stay away from and how I decide if I'm ok with keeping a moderately bad product in my skincare routine. 

Ingredients to Avoid (All information on ingredients is either from my brain from years of skincare training or the EWG Skin Deep Cosmetic Database):

  • Mineral Oil: MIneral oil is a cheap oil made from petroleum that traps moisture in skin, but doesn't actually hydrate the skin. It simply doesn't do anything for us and can even trap bacteria in the skin and pores. There is belief that it could be a possible human immune system toxicant and since it doesn't actually do anything for the skin and comes from petroleum I say, DO WITHOUT IT!
  • Parabens: If you are familiar with skincare, you probably know that a lot of companies are straying away from the use of parabens as preservatives because of it's possible link to cancer and how it can mimic estrogen in the body. For this reason, it's going on my DIRTY list.
  • Phenoxyethanol: This is an ingredient that I think will be one of the hardest to stay away from, because it seems to be in everything!! haha Again this is a fragrance or preservative ingredient and is restricted in Japan in cosmetics in certain quantities. I've noticed it often in cleaners and toners, but can be in moisturizers as well.
  • Propylene Glycol: This one is a humectant and skin conditioning ingredient that has been associated with skin irritations and dermatitis. After reading about how it is a probably carcinogen, I've decided it's on my DIRTY list. 
  • Synthetic Colors (Yellow 5, Red 40, etc.): In my opinion, there is no reason that a skincare product needs to be colored a certain way. If there is naturally occurring pigment in the ingredients that is fine, but do not add synthetic colors that are made from petroleum just so the mask is orange. To me this is an easy one to get rid of so welcome to the DIRTY list!
  • Benzalkonium Chloride: A surfactant found is many household cleaning supplies, I have no use for it in my cleansers! It has been shown to be a skin, respiratory, and eye irritant. 
  • Triethanolamine: This is a relative of Nitrosamines, which are a very likely carcinogen, which means that it is a very possible health hazard. It is used as a buffering and emulsifying agent and will no longer be irritating my skin.
  • Polysorbate 20/PEG Sorbitan Laurate : These are similar in that they are derivatives of Lauric Acid, and they have an extremely high contamination of Ethylene Oxide and 1,4 Dioxane which are very highly likely to be carcinogens. Lauric Acid is the fatty acid found in coconut oil that is totally fine and healthy for your skin. However, these forms of it, are very much a toxicant and welcomed on the DIRTY list. 

Ok this list could probably go on and on, but I will stop now and encourage to use this website and app to go through your own collection. If I come across more research and more ingredients that I will be omitting for sure, I will made sure to write new posts updating those who want the info! For now I will be for sure eliminating those above.

Now let me describe some of my decisions regarding ingredients and how I read labels. First off, it's important for you to know that the order that ingredients are listed shows which are in higher quantities. The first listed ingredient makes up the most of that product, the second being the second most, and so on until the last ingredient has the least concentration within. This is important to note because it can help you decide if that product is good for you or not. My biggest concern is usually the first half of the ingredients. I do not want a single chemical in those. Ideally, there wouldn't be a chemical in the whole label, but if I have a product that I love and works well for my skin and the second to last ingredient is a chemical, I might consider using it occasionally because I know the concentration is lower. 

Next, I look for the purpose of the ingredient. Sometimes products will be rated higher because they contain an ingredient like Glycolic Acid which exfoliates the skin. That glycolic acid could be listed as a potential skin irritant for this, which is fine with me because that's the reason I'm using it. I want it to break down the skin and exfoliate the dead cells off. As long as that Glycolic Acid is coming from a more natural source like maybe sugar cane, I am fine with it and don't consider that product to be a hazard. 

Now if you are thinking about making this transition with me into cleaning up your skincare, your next question is probably about how to make that transition. My recommendation is to do it slowly and phase out products as you use them up and purchase only healthy alternatives. If you have brand new bottles or back ups on hand, try returning them or giving them away to friends that don't necessarily care about the chemicals in their skincare (to each their own!).

So what does this mean for Andrea Fontana Beauty? I am a firm believer in putting your money into the health of you skin first so from here on out, I will not be recommending skin care products that are not clean for your skin. I will include you on this journey and plan on doing a follow up post asap, as to what products I've had to get rid of and what I've replaced them with. When I move on to hair care and every day makeup products I will do the same. For makeup however, I will continue to recommend, try and use all brands of products because I do not use the same things every day and still need high performance products for wedding day and special event makeup. For me this isn't an all or nothing process. As long as I'm converting 75% of what is going on my face and body every day, I will consider that a win. 

Again, I'm not encouraging you to throw out everything you own, but rather look where you can make some healthier changes in your every day routines. As always send all questions my way and let me know how you feel about this topic in a comment below!

Have a beautiful week,

Andrea

Lash Boost Review

I think I might be the last one on the block to try a lash growth serum, but my review is going to be a little different than most. Let's get a little personal. Here's the back story as to how I ended up using Lash Boost in a nontraditional way. 

In November I was washing my face one night and looked up and the way my hair happened to fall, I spotted a completely bald spot right in the center of my head about the size of a dime. I immediately inspected it and stood in shock wondering what I was looking at. Changes in your body externally can often be a sign of something going on internally and my mind went in 15 directions. I immediately Facetimed my sister, because what else are sisters for...haha and probably repeated 18 times, "ARE YOU SEEING WHAT I'M SEEING?! "

I'm lucky enough to have an uncle who is a PA and immediately called him to discuss. His instinct told him it was Alopecia Areata just based on the fact that I had recently quit a high stress job, but he wanted me to go to my doctor to rule out any thyroid or other health issues. Turns out he's the world's smartest PA (haha) and my doctor also thought it was Alopecia Areata and said not to worry about it. It's really hard not to worry about something that is caused by worrying, if that makes sense. The most frustrating thing about Alopecia Areata is that there is no guarantee the hair will grow back, so I was really bummed when I saw growth throughout the next month, and one morning in December, it all fell out again. 

This then prompted a conversation with one of the amazing mom's I nanny for who sells Rodan & Fields. I asked her if anyone had tried the lash boost on their scalp and if she thought it would work. She had never heard of anyone trying it and obviously couldn't recommend doing it since R&F had never tested it, but I was pleasantly surprised to receive it for Christmas from her! Let me repeat, R&F DOES NOT ENDORSE PUTTING LASH BOOST ON YOUR HEAD, but I was self conscious at this point and wanted to try a more natural route before going to my doctor for steroid shots to stimulate growth. If the bald spot had been anywhere other than the center of my head where I part my hair I probably wouldn't have cared as much, but it was something I was having to cover and hide on a regular basis which is annoying. 

As far as my routine goes for Lash Boost, I started off the first few weeks by applying it every night to my lashes and whatever was leftover I would apply to my scalp. I never got more product from the tube. After the first few weeks, I started using it every other night to stretch the product and I don't feel like my results were affected. With these types of growth serums, you will always need to keep applying them in an area like your lashes that naturally shed and regrow every 6-8 weeks. So if you stop using it, the results will go away. I had so many brow clients that would use it to regrow areas of their brows when reshaping so that's something to think of too!

Now for some pictures of what my scalp and lashes looked like when I started using Lash Boost on them right before Christmas and what they look like today, 10 weeks later. I stopped using the Lash Boost on my scalp about a month ago probably because I just wanted to get the hair growing, and I'm happy to say that a lot of the hair has grown back, so much so that I can't really see the bald spot anymore! (Sorry if close ups of my scalp are weird...haha) I learned through this process that I know quite a few women who have experienced this type of hair loss due to stress so I'm happy to share my story if you happen to be going through the same thing and it makes you feel more at ease with what you're going through!

IMG_0691.jpg
FullSizeRender.jpg

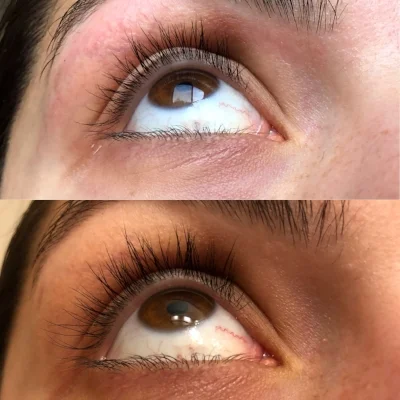
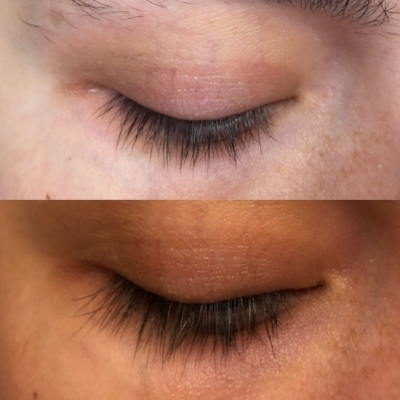
As far as my lashes go, they have always been long and thick, they just won't curl and always stay super straight. I have since found that they hold a curl much better and are significantly longer and fuller. I never felt like you could see my lashes in any pictures but now I feel like you can. 

Top Image: Before, Bottom Image: After

Top Image: Before, Bottom Image: After

Top Image: Before, Bottom Image: After

Top Image: Before, Bottom Image: After

You can really tell in the lash pictures how much longer and fuller my lashes look. I didn't take any pictures with mascara on because you didn't come to the post for a mascara recommendation. haha I wanted to show you my actual lashes.

Overall I am extremely happy with my Lash Boost experience. If you are looking to purchase please reach out to Kristen HERE! She is so wonderful and deserving of your business! I know she has a Lash Boost special going on right now! I cannot thank her enough for gifting me this Lash Boost and helping me get rid of my bald spot!

Let me know in a comment below if you have tried a lash or brow serum before and if you liked it! I totally think it's worth the money, do you?

Have a great rest of your week,

Andrea Fontana

Water. Water. Water.

If you've ever had a facial with me, you've probably heard me talk about drinking water. It's one crucial way to keep your body and skin especially, healthy. I know I'm not the first to tell you this, so I'm going to instead share some tips on drinking water and how it relates to your skin.

Your body is mostly made of water, therefore you need to make sure you are staying hydrated every day not only for your skin, but for your general health. Your skin is your largest organ but it's also the last to get water. So if you don't drink enough, your organs internally will need to absorb and use that water first. This is why it's so important to stay up on drinking water. You have to make sure your skin is getting it as well, in order for it to stay healthy. 

How much should you be drinking? While everyone is different, I generally recommend drinking half your body weight in ounces. So if you weight 140 pounds, try to get in at least 70 fl. ounces of water a day.

When should you drink more? If you are pretty active you need to be drinking more than that because you are losing water and electrolytes when sweating. I usually try to follow the rule for drinking 1 ounce for every minute that I'm sweating in addition to my normal water intake for the day. You should also be drinking more water when you're stressed or sick, because your body is focused on healing or keeping you healthy, and your skin gets even less water. If you know your are sick or dealing with a lot of stress, give your body a head start and drink more water. 

How quickly should you drink water? It's better for your body and skin to slowly sip water throughout your day than to chug it a few times. If you drink too much at once (more than a cup), it'll go straight through you to your bladder. Some people complain that they don't like to drink a lot of water because then they have to use the bathroom constantly, but I'd bet they are probably chugging their water or drinking it too fast and their body is just excreting it, not actually absorbing it. If your body can't absorb it, it won't get to utilize it! Drinking your water slowly allows your body to absorb it, which means all of your organs will get to utilize it, especially your skin that gets it last! If you're guilty of chugging your water, try switching to a water bottle with a straw to drink it slower.

What temperature should you drink it at? In general it is better to drink warm or hot water because your body doesn't have to expend energy to heat it up to your internal body temperature. However, there are some exceptions to this rule. Drinking cold water when you're extremely hot in the summer or you just got done working out, is ok because it can help cool off the body. 

Other tips and tricks regarding water consumption:

  1. Check your lips! If they are constantly dry, this might be a sign that you are dehydrated.
  2. Drink your hot or room temp water with lemon juice! This is my favorite way to flavor my water and the lemon juice aids with digestion.
  3. Use apps to help you count. There are so many that will help you keep track of your daily consumption. If you are competitive you might like this because it feels like a game.
  4. Drink a glass of lemon water before you have your coffee in the morning so start the day off right!


I personally notice a huge difference in my body when I'm drinking a lot of water. Stay hydrated friends! If you have more questions about drinking water, feel free to leave me a comment or message!

Have a beautiful day,

Andrea 


Healthy Skin

First off thank you so much for the love shown since I announced I would be blogging again! I love being able to share my advice and passions with you all and am so thankful that so many of you are looking forward to me starting this up again. I got many requests so we will start with those!

To kick things off we will be talking about healthy skin. I got a few requests regarding it and there are two directions this post could go, so we will be tackling both! First, I'm going to be talking about the products I use to maintain healthy skin. Then, I will be discussing the makeup products I like to use in order to make my skin appear healthier, even in the time of a major skin crisis. 

First off however, I want you to know my philosophy with skin care. I teach all of my clients about the importance of being able to really understand your skin. Everything is about BALANCE. You will see me use this word a lot, because I am a big believer in trying to help your skin achieve balance. Just like your body craves homeostasis internally, your skin craves balance. The more you can learn about and treat your skin depending on how it is any given day, the more likely your skin is to be balanced and not as likely to freak out. 

If you don't know about your skin's acid mantle yet, listen up. It is a vital layer of your skin that protects you from various bacterium, viruses, and contaminants that could come in contact with it. We want it to be balanced so it can properly protect you. One of the most important ways to balance it is with a toner. Toners adjust the pH after cleansing, which can be very stripping in order to cleanse properly. There are various toners for all different skin types; from exfoliating to gentle and hydrating. The trick is finding the right one for you. Always feel free to reach out to me if you need help finding the right product. I personally use the Dermadoctor Ain't Misbehavin' Glycolic and Lactic Acid Toner. I love how it gently exfoliates my skin every day which speeds up my cell turnover and helps my pores not feel so congested and clogged with excess oil. 

The next holy grail product that I love for achieving healthy skin is Organic Rose Oil. Rosehip oil is a dry oil that I give a lot of credit to for fading my hyperpigmentation left from acne scars. If you're oily and acne prone you need to try this oil to bring your skin balance and even tone. Rosehip oil is filled with essential fatty acids and Vitamin E so it helps to hydrate you, while the low pH helps keep that acid mantle balanced. I buy mine at my local health food store and use it every night before my moisturizer, as my serum. 

A magical mask for all skin types is Bentonite Clay. I can't speak highly enough of this stuff. I recommend it to everyone because of it's strong cleansing and detoxifying properties. I bought a tub of this at my local health food store and it lasts forever! Simply mix a little clay powder with water until you get a paste consistency, then apply it to your face and leave it on for 20-30 min. I try to leave it as long as I can bear it because it will dry and start to pulse your face. When you take it off, your face will often be blotchy but that is completely normal. So what exactly is happening here? Bentonite clay is great at pulling toxins and such out of the body and rapidly increases the circulation. The clay is also able to bind to any excess hydrogen molecules in your skin to lower the pH and make room for your skin to bind more oxygen. You thought I was done talking about that acid mantle didn't you? Haha

The last product I want to share with you is a sleeping mask. Now I'm so obsessed with sleeping masks, so I plan on devoting a whole post to them, but I will share my favorite one now because it helps my skin maintain it's hydration on a weekly basis. Whenever I've been drinking or in the sun, I make sure I sleep that night with the Origins Drink Up Intensive Overnight Mask in place of my moisturizer. I also use it whenever my skin feels extra dry and dehydrated, usually in the winter. You will wake up the next morning with happy skin that is no longer dehydrated and feels baby soft. 

Ok. You should have learned two things by now. I respect my acid mantle and you should respect yours too. But more importantly BALANCE! Ok now let's talk about makeup.

While a balancing skincare routine is most crucial to the health of your skin, a few makeup products can take your skin to the next level. 9 times out of 10 if I get a compliment on my face at the spa it's usually something about 'my skin being so healthy'. 10 times out of 10 it's probably my highlighter that made them notice. A good highlighter will give you the healthiest and most beautiful glow. If you haven't been drawn yet to the shimmer and shine of highlighters like a moth to a flame, don't say I didn't warn you when you want to buy them all! While I love both powder and liquid highlighters, I use them for different reasons. 

My favorite powder highlighter would hands down be the Makeup geek highlighters because they are so smooth and STUNNING. I have Moonlight Sun (a warm light gold) and Luster (a beautiful cool pink) that I am obsessed with. They even have duochrome highlighters that are beautiful too. I use these highlighters every day on the high points of my face. If I want my skin to be dewy I reach for my either my Becca Shimmering Skin Perfector Liquid Highlighter in Opal or the Sephora Collection Radiant Luminizing drops. Both work great when mixing with foundation for an all over glow, but the Becca ones work best to also use on your cheekbones. The Sephora drops are a much more affordable option however.

So there are my favorite products for healthy skin. If you have further questions always feel free to reach out to me at andreafontanabeauty@gmail.com.

Keep the requests coming and have a beautiful and healthy week!

-Andrea

Disclosure: Amazon links are Amazon Affiliate links which means that I receive a small commission from your purchase. The price of the product does not change if you use my links. Your support allows me to continue to create new content for you and I will forever be thankful for your support if you choose to use my links.