The Bane of My Existence

If you wear makeup you generally associate washing makeup brushes with being annoying, time consuming, and all over the worst part about wearing makeup. I feel like there's just a general consensus that it's the least favorite task to do. Thankfully, many companies have used this to their advantage and created tools and products to help us clean our brushes quicker and better. Until recently, I had yet to buy anything of this nature because I figured washing brushes was always going to suck and just accepted it as a part of my routine. That is until now.

I believe Sigma Beauty was if not the first, one of the first, to come out with brush cleaning mats and gloves with bumps and ridges to aid in the cleaning process and help break down makeup quicker while still being gentle on your brushes. I wanted one for a long time, but again always put it on that list of products I didn't reeeeally need, especially with the $25-$40 price tags. Fast forward a few years and product launches by many companies, Real Techniques came out with a Brush Cleansing Palette that had a handle on the back for you to slip onto your hand and essentially clean your brushes in your palm. Oh and did I mention it was only$14.99 (plus I feel like Real Techniques is always Buy One Get One Half OFF at Ulta. It is right now so hurry and snag some products if you want to try this after you're done reading!) Now if there's a company that can create great tools for a good price, it's definitely Real Techniques. You've heard me say before that I stand behind their brushes and sponges 100% so I was hoping this brush palette would be no different. 

IMG_8083.JPG

It came with a few free samples of their brush cleansing gel, but if you read my post here (CLICK ME) you know that my holy grail brush cleanser is a $5 solid bar of Dr. Bronner's Soap. If you haven't read that post, read it and get yourself some Dr. Bronner's NOW! (I wrote this whole post then went back to that one and apparently washing brushes was the bane of my existence in November 2015 too haha) So I got out my soap and started washing away. As you can see below, the palette has three different sized and textured bumps; little dots, medium x's and large bumps. I loved the different sizes because they helped clean the different brushes depending on size and density of bristles.

IMG_8084.JPG

Another thing I really like about these types of cleansing mats and gloves is that they are usually made of silicone which allows for the tool to bend easily and stay clean. I feel like I will get thousands of uses out of this product which is again very typical of Real Techniques. Just because it's affordable doesn't mean they skimp on quality.

IMG_8085.JPG

So what's my overall opinion of the Brush Cleansing Palette? If you wear makeup often  or simply have a lot of brushes, you'd probably really enjoy having this tool. While I feel like it's difficult for a product to drastically cut down my wash time because let's face it, I have A LOT of brushes, I do feel like they came out really clean and quicker than I expected. Even the brushes that are really hard to wash cleaned quicker. You can buy Real Techniques products online or in stores at Ulta, Walmart, Target, Walgreens, Meijer and many other places! 

Have a beautiful day friends! 

-Andrea

Dre Does a Summer Face Routine

I hope you enjoyed my Tips for Summer Makeup from earlier in the week! Here is my requested foundation and face routine for this time of year. Let me know if you have any other summer related requests and I will keep them coming!

Here is a before and after of no makeup to makeup but I've included a picture below that is just my makeup after my face routine (no brows, eyes or lips).

1. Always start with a clean face. A skincare routine is the key starting point to any makeup application. You'll see I have plenty of imperfections in that before photo but we all do so embrace yours!

2. Next I go in with a primer. On Monday I posted about the Cover-FX Mattifying Primer with Anti-Acne Treatment. Click here for that post. Make sure you don't apply too much primer or else your makeup will not go on smoothly. This will depend on the type and texture of the primer you are using. If I'm using a silicone textured primer I use a small pea sized amount for my whole face. Let this absorb before you move on.

3. Next I spray my face with a setting spray to create a barrier between oil and foundation and give my foundation something more to grab onto. I love the Urban Decay Deslick Makeup Setting Spray, but in the past I also loved MAC Fix+. It's also VERY crucial that you let this layer completely dry and set so you have a smooth and dry work surface for your foundation.

4. Next I mix two foundations. I love the Revlon Colorstay Makeup for Combo/Oily Skin because it has great staying power and a nice satin finish. However, it is a little thicker than I like for the summer so I've been mixing it with MAC Face & Body Foundation, which is a lighter foundation. It has light to medium coverage so this is why I like mixing it with a heavier foundation. It's water resistant and long wearing so it's the perfect match for the Colorstay Makeup. I apply a very thin layer of this foundation combo all over my skin using my Real Techniques Expert Face Brush. One reason I like mixing foundations in the summer is that one is lighter and the other is darker. This allows me to customize my foundation shade every time I apply my makeup, depending on how tan I am.

5. Next I use my MAC Pro Longwear Concealer under my eyes. I prefer to apply this with my ring finger and strong tapping motions until it is blended. I use a more yellow toned concealer (NC30) to counteract the purple tones of my dark circles. I'm obsessed with this product and I have multiple in my kit because it works wonders and doesn't crease throughout the day. I then go over it with Maybelline's Instant Age Rewind Dark Circle Eraser in the shade Brightener because it is slightly pink toned and does a great job of brightening the under eye area. Then I set all of this with a very finely milled HD translucent powder. I love using the HD Studio Photogenic Finishing Powder in 01 by NYX Cosmetics. (This is the one I was talking about in my last post though, to avoid if you are going photographed a lot...i.e. your wedding).

6. Next since I have applied a thin layer of foundation I generally need to spot conceal my hyperpigmentation and blemishes on my chin with a small concealer brush. In the winter I would typically wear a heavier foundation all over that would cover most of these but I prefer not to wear that heavy of makeup due to humidity and heat in the summer, so I prefer to spot conceal. I swear by the Sonia Kashuk Hidden Agenda Concealer Palette. It's the bomb dot com at covering blemishes and staying put.

7. After spot concealing I will generally set my entire face with that same NYX HD Finishing Powder using a big fluffy powder brush.

8. Now for contouring. I use a small fluffy blending brush to apply Benefit's Hoola Bronzer to the hollows of my cheeks and then use a larger brush, the Contour Brush by Real Techniques, to blend out the color really well. I also use the contour brush to blend Hoola around the temples of my face and my hairline.

9. Next I apply a long-wearing powder blush to the apples of my cheeks and blend toward my hairline. My favorite blushes of all time for this are tarte's Amazonian Clay 12-hour blushes because they are all beautiful and seriously last forever! I own a lot of them...haha

10. Next I like to apply a subtle highlight to my cheeks to give me a subtle glow. My favorite of the moment is MAC's Mineralize Skinfinish in Perfect Topping.

11. Finally, I spray my face one last time with the setting spray to set everything and keep it in place for the whole day! I like to fan my face with a makeup palette to speed up this process and make sure nothing drips or moves!

There it is! I know it may seem like a lot for some of you, but as a makeup artist I'm used to using a lot of products! I hope you enjoyed and can apply some of these techniques to your summer makeup routine. Keep the requests coming!

Have a beautiful day,

Dre

Dre Does January Favorites

| Click to Enlarge |
I'd really like to start sharing my favorite products from the month, both beauty and non beauty related. While reviews are great, I think it's more realistic and beneficial to know what people are using consistently. So here are my January Favorites!

1. Physician's Formula Organic Wear Mascara: I had heard some really great things about this mascara but I never gave it a serious thought because of the extremely tacky green metallic packaging. That sounds really stupid when you type it out...haha but seriously! If it wasn't for a ridiculously great sale at Rite Aid and a two for one package, I might not have ever tried it, but I really do love it! The brush is a little larger than I'm used to so that took some getting used to but I love it now. I like how it separates my lashes and gives me amazing volume, but the thing I like most is that I can apply multiple layers and it doesn't clump up like some volumizing mascaras do. I also really like how easy it is to remove, yet it doesn't flake off when you're wearing it. I absolutely hate mascaras that are really hard to get off. I don't care how great it makes my lashes look, I won't realistically wear it if it drastically increases my nighttime skincare routine (ie. Benefit's They're Real). I highly recommend it and now I'm even happier that I got two tubes for the price of one!

2. Briogeo Don't Despair, Repair! Hair Mask: I got this hair mask in my January Ipsy Glam Bag. Click here for my post on it! I managed to get 4 uses out of that sample and I would say I noticed a difference in my hair's texture. While my hair isn't very damaged, I could tell the mask made my hair softer and smoother. I am probably going to be purchasing the full size soon before that Ipsy discount expires! 

3. Maybelline's 'The Elixir': I won't go too in depth with these since I just posted a review here on them, but I am a huge fan. They are my new favorite lip gloss which is huge since I'm much more of a lip stick girl. I love the pigmentation and texture. They aren't sticky and smell yummy too! 

4. Aveda Beautifying Compostion: Since I've been going to an Aveda Institute since October I've been falling in love with all Aveda Skin Care Products. I could spend hours talking about which ones I love, but for the sake of this post I picked our Beautyifying Composition as a favorite because it's seriously such a multi-use product. It's designed for body, bath, and scalp so I use it as a deep conditioning treatment for my hair, a remedy for any dry skin patches on my body, in my baths, and especially on my cheeks because it's an anti-eczematic! That's only a few of its uses. I'm going to be doing a post on it soon so look out for that! 

5. Beyoncé's new album: I have honestly not been much of a Beyoncé fan in the last couple of years just simply because I couldn't get into her music. That all changed with her new album though. I absolutely love it all; the songs, videos, everything! So good. My top songs however would be Drunk In Love (obviously haha), Blue, Heaven, and Flawless. Just incase I wasn't the last person on the planet to buy it and you haven't listened yet, please do! 

6. Covergirl's Outlast Stay Fabulous 3 in 1 Foundation: This is another product I heard about through the YouTube world that was getting good reviews so I decided to pick it up at the end of December and it's amazing! When I saw the 3 in 1 claims (primer, foundation, and concealer) I wasn't expecting much. However, this foundation stays on really well, gives you a flawless finish, and conceals the majority of my hyperpigmentation and scarring problems. It has a matte finish though so if you are really dry or like a dewier finish it might not work best for you. I don't like my skin to be 100% matte so I mix it with a tiny bit of another foundation and I find this works well to add some moisture. I have a large amount of hyperpigmentation on my chin due to my Mediterranean skin that tans easily, so when I breakout I scar no matter what. I had to remove this foundation from my chin at school for a procedure and everyone was shocked at the scarring that this makeup was covering, so I have to give Covergirl credit for making an amazing product. I highly recommend this one. 

7. Real Techniques Expert Face Brush: I talked about this brush in my Brush Guide found here, but it's another must have for me. I've only reached for this brush when doing my foundation since I bought it a few months ago. Great price and great quality.

8. Celestial Sleepytime Tea: Sleepytime tea is my go-to night time tea. With no caffeine and lots of amazing herbs it smells heavenly and tastes so good. I've gone through a whole box in January alone because I drink it so much. It's so prefect for relaxation and getting you ready for bed (shocker I know since it's called Sleepytime...haha).

9. tarte Amazonian Clay 12 Hr blushes: To say that I love these blushes is an understatement. I have many and they are honestly the only blushes I grab for 95% of the time. Perfect amount of pigmentation, gorgeous shades, and they last longer than any other blush I've ever used. 100% worth the higher price tag. Go to your nearest Sephora or Ulta, swatch them all, and TRY to walk out without purchasing at least one...I DARE YOU! I'm like a kid in the candy store with all tarte products...

So there they are! The first month of 2014 is over and these are the products that helped me welcome the new year. What were your favorite products last month? Leave me a comment below and let me know!

Have a beautiful day,

Dre

Dre Does a Brush Guide

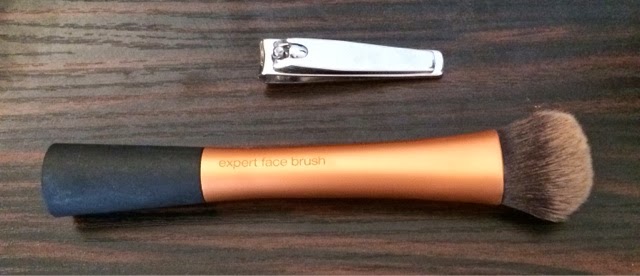
This has been the most requested post so here it is! It took some time to really choose which brushes are my favorite since let's be honest...I have way more than I'm going to show below. But I've chosen my top 12 brushes that I think every woman needs. Now some were purchased in sets or years ago, so they might not be available for purchase right now. However, the point is the shape and type of brushes. If a brush as a really unique shape, I've made sure to choose it only if it is still available. I'll leave links to all of the ones that I can at the end of the post, as well as information as to which were purchased in a set. I've also taken the pictures of the face brushes next to a normal sized nail clipper, so you have a guide for the approximate brush sizes. (Sorry if some are a little dirty, but I used them before I took these pictures...haha)

1. Foundation brush: My favorite is the Expert Face Brush by Real Techniques. I love this brush for the unique shape and because of how dense it is. It's really good at applying foundation evenly. A lot of people like flat top buffing brushes because you can get a really good natural looking application, but I find this brush gives me a similar finish. It's also great at getting around your nose and chin because of the rounded shape. 


2. Concealer Setting brush: Now I didn't include a brush for concealer because personally I prefer applying with my fingers. I find the warmth of my finger tips melts the concealer just right to give a more natural look when covering. However one place you can't skip out on is setting your concealer, especially under your eyes. A small fluffy brush will do the trick and as I've talked about before I love the Setting Brush by Real Techniques. It's slightly pointed at the tip, so it gets right under the eyes nicely. It's also fluffy enough to apply just the right amount of product. 


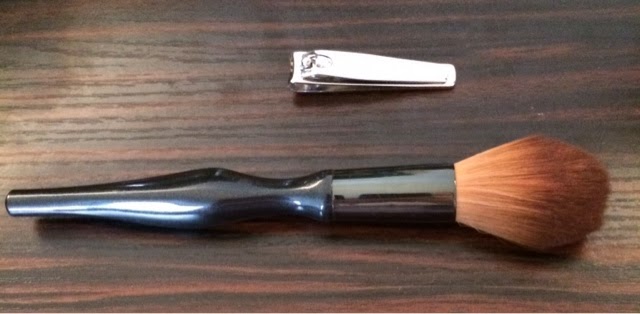
3. Contour Fluffy Brush: Now I know everyone doesn't contour their faces, but I still think a fluffy medium sized brush is important. It's a great multitasking brush. You can of course use it for contouring, but also for applying highlight or even blush in a pinch! I really like this one called the Contour Brush from Real Techniques (are you seeing a trend here yet? But more on that later...). It's the perfect medium size. 


4. Flat top dense medium brush: This brush is great for cream products. The synthetic dense fibers are great for picking up and blending cream products. So once again this brush is great for blushes, bronzers, or highlighters. The size is perfect as well. This one is called the Buffing Brush by Real Techniques but many brands make a similar one.

5. Fluffy blush brush: Everyone needs a brush for blush and I'm obsessed with this one from Sonia Kashuk. It's available at Target and it's a must have. It is super soft and going strong after at least 4 years of use. The thing I like most about it is the density. It's pretty fluffy so it doesn't pick up too much product, so it allows you to build up cheek color to just the right amount. I think the packaging looks a little different now.


6. Powder Brush: Now this brush is the least unique but it's still a must-have. In order for your makeup to stay all day or night long, you need to set it with powder. This is simply a large fluffy brush from a Sephora set from at least 5 years ago, but it's obviously great quality and has worked so well setting my powder all of these years that I still haven't needed a new one. 


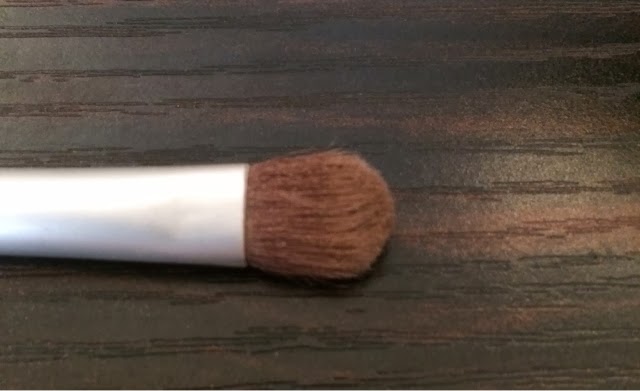
7. Eye Shader Brush: This is another typical brush shape, but it's another must-have. You need a good  flat shader brush to pack color onto your lids. This is another Sephora one that has lasted me years, but every brand of makeup brushes sells a dupe for this.


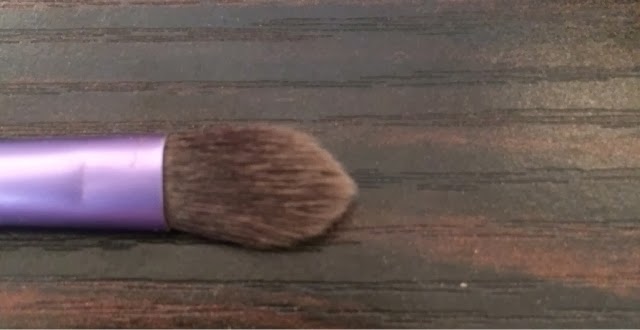
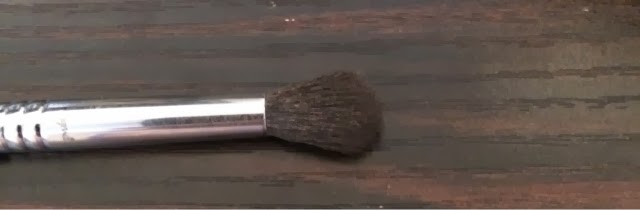
8. Fluffy Pointed Shading/Blending brush: So this brush is extremely unique shaped but I had to include it because it is a dream for blending the outer "v" of your lid (aka the outer corner). It's fluffy enough for blending but the pointed tip gives you enough control to make specific shapes. I just love it and use it for almost every eye look that I do, so I'm being serious when I say you must own it! It is called the Base Shadow Brush by Real Techniques.


9. Fluffy blending brush: The key to beautiful and smooth looking eyeshadow is blending. That is no secret. While I own and recommend having multiple blending brushes of different densities and sizes, a simple fluffy brush is the first step. This one is the E35 Tapere Blending brush from Sigma Beauty but many companies make great ones. 


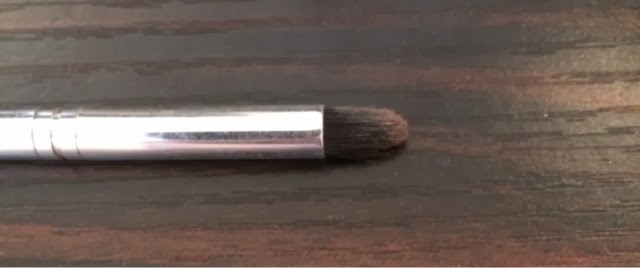
10. Definer Pencil Brush: Whether you want to do a dramatic crease, outer v, smokey eye, or natural eye, a pencil brush will work wonders in applying the darker shades where you want them before you blend them out. They are dense and great for smudging color into the upper and lower lash lines as well. This one is the Smudge Brush from Ulta and is a great size for getting into all of these places. It's a great multi-use brush. It is years old as well though, so it could be hard to find this exact one.


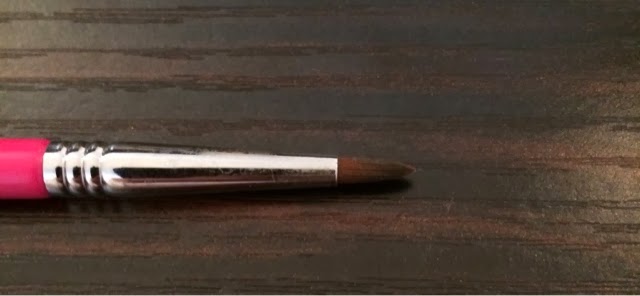
11. Eyeliner brush: A fine pointed eyeliner brush is key because it can do a lot for your lash line. Whether you use it with gel eyeliner, eyeshadow, or to smudge out pencil liners, it gives you precision. So make sure it has a nice density and a good tip. I got this one free with a Sigma Beauty purchase but it is the mini version if their E05 Eyeliner brush. 


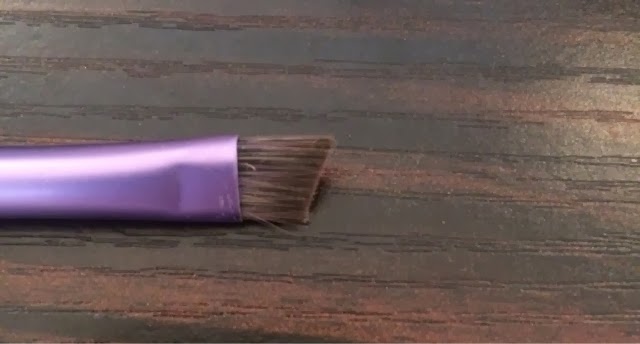
12. Angled Brow brush: Lastly, we have a brow brush. I use this one every day to fill in my brows with shadow and I love it. This shape also works nicely if you want to smudge out pencil eyeliner, or set your liner with eyeshadow for a smokier look. This is another shape that you can find easily from a lot of other brands, but I have to say I love the quality of this Real Techniques one.


So those are my favorite brushes! As you can tell I'm obsessed with the Real Techniques brushes because they are amazing quality for the prices. They are extremely soft and durable. I also love my Sigma Beauty brushes, however they are a little more expensive. If you have the money, I say invest in the Sigma ones, but if not the Real Techniques ones are amazing as well. 

Now for where to purchase
Brushes 8 and 12 came in a 5 piece eye starter set from Real Techniques for $18 that you can find below online or at Ulta.
http://realtechniques.com/shop-collection/your-eyes-enhanced/starter-set

Brushes 3 and 4 came in a 4 piece core collection set from Real Techniques for $18 that you can find below online or at Ulta.
http://realtechniques.com/shop-collection/your-base-flawless/core-collection

Brushes 6 and 7 came in a 7 piece Deluxe Antibacterial Brush set with a case for $60 from Sephora.
http://www.sephora.com/deluxe-antibacterial-brush-set-P197107

The rest were purchased individually:
Brush 1 is $9 below online or at Ulta.
http://realtechniques.com/shop-collection/your-base-flawless/expert-face-brush

Brush 2 is $8 below online or at Ulta. 
http://realtechniques.com/shop-collection/your-finish-perfected/setting-brush

Brush 5 is $17.18 online or in stores at Target. 
http://www.target.com/p/sonia-kashuk-kashuk-tools-domed-blusher-brush-no-29/-/A-14346298#prodSlot=medium_1_49

Brush 9 is $14 below. 
http://www.sigmabeauty.com/product_p/e35.htm

Brush 10 I couldn't find online anymore but lots of brands including Sigma Beauty make pencil brushes. 

Brush 11 is $12 below.
http://www.sigmabeauty.com/product_p/e05.htm

Hope this gives you a place to start or add to your brush collection! 
Have a beautiful day,

Dre

Dre Does a How-To: Bigger and Brighter Eyes

Do you get way less sleep than you should and have the resulting exhausted looking eyes when you wake up like me? Don't worry. Thanks to my third cup of joe I've compiled a list of tips on how to make your eyes look brighter and bigger and thus fooling everyone into thinking you've gotten enough shut eye! 

1. Highlight your inner tear duct. Do yourself a favor and get a nude colored pencil eyeliner now! I love this new one from NYX called the Wonder Pencil because it comes in concealer-type shades but is in a easy to apply form as a pencil eyeliner. This new best friend makes it super quick and easy to highlight the inner area of your eye. You'd be surprised how quickly this trick brightens and makes you look more awake. 

2. Highlight your bottom waterline. You can use the same nude pencil liner to line this area. Normally you would put a darker color here to define your bottom lash line, but applying a nude color will help open your eyes and make them look bigger. Some people like to use white for this, but I prefer nude because it's less harsh and more natural looking. 

3. Set your under eye concealer. If you want to keep those dark circles under your eyes hidden until bed time and avoid creasing, you must set your concealer. Make sure to use a good concealer in this area that brightens this area (try pinkish tones) and set it using a fluffy brush and a finely milled powder. I like the Sonia Kasuk Hidden Agenda palette because it comes with three concealer shades and one setting powder. I use this 'setting brush' by Real Techniques to set the powder and I love how it applies the powder! You want to make sure you use a fine powder so that you don't run the risk of it settling in any fine lines, making you look more tired.

4. Define your eyelids. One technique that I love for a really natural look is to define both the inner and outer areas of my lids and highlight the center of my lids. This makes your eyes look huge and gives them a really nice glowy appearance. In the picture below I've done my makeup this way and you can see how it enlarges my eyes and gives them that glow. You might be surprised when I say that all I used is two matte shadows to complete it. So it's an extremely quick and easy look. Come back tomorrow for a post on how exactly I created this look! 


Have a beautiful day,

Dre