January 20x20 Fashion Challenge

When Katie over at @whatkatefinds, first mentioned that she was going to do a 20 x 20 for the first 20 days of January, I was instantly intrigued. After doing my mini capsule for Chicago in September (Click here to read about that), I knew that a true capsule closet was never going to work for me. However, I still love the principal of it and that it forces you to be more creative when putting your outfits together. As Katie encouraged others to join her, I knew that I wanted to try it out and see what happened. So today I’m sharing just that. My thoughts on choosing 20 clothing items only to wear for 20 days.

I am quite the planner, so you better believe I started a list in December, categorizing tops, bottoms, jackets, etc and even going as far to assigning each clothing piece a number. I knew that I wanted to choose some versatile classic pieces like a graphic tee and high waisted denim Levi’s, but I also knew I wanted to have some fun. I didn’t want to just wear a top and a bottom and call it good (although as you’ll see below, sometimes that’s all I had the energy for haha).

Here is the list of 20 items I chose to work with for the 20 days:

  1. Sleeveless leopard blouse

  2. Mustard cardigan

  3. Cream crew neck sweater

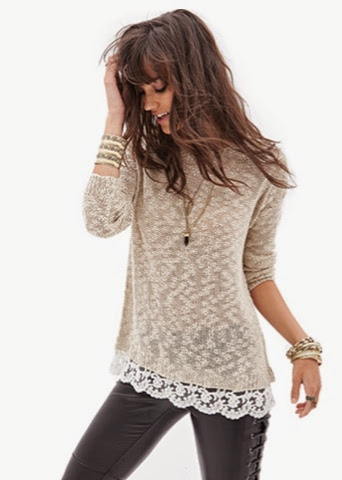
  4. Tan/Beige crew neck sweater

  5. Orchid Redefining Beauty Graphic Tee

  6. Gray embroidered floral sweatshirt

  7. Black & White striped tee shirt

  8. Long sleeved White Redefining Beauty Graphic Tee

  9. Light Wash Denim Button Down Shirt

  10. Camel Brown Turtleneck

  11. Olive Green Short Sleeved Maxi Dress

  12. Gold Pleated Velvet Skirt

  13. Leopard Skirt

  14. Black Paperbag Waist Pants

  15. Burgundy Leggings

  16. Medium Wash High Waisted Levi’s

  17. Black Levi’s

  18. Black Adidas Leggings with White stripes

  19. Black & White Hounds-tooth Blazer

  20. Olive Green Blazer

One thing that I wanted to be really conscience of with this 20 x 20 challenge, was to choose a lot of thrifted items since that’s all I’m purchasing this year and to show you guys how versatile and on trend thrifted pieces can truly be! 11 of the 20 items ended up being thrifted.

There were some exceptions that I wanted to share before I get into the outfits and what I thought about this whole experience…

  • Shoes were not included in this because I live in Michigan and during this 20 days we experienced rain, sun, lots of snow, and more.

  • While I did include two pairs of workout leggings, I did not wear them to workout and didn’t include my workout clothing. I knew I would need clean workout clothes for most of these days and that would make for a LOT of laundry, so I wore other items to workout in.

  • Accessories for me were also not included because this is what I think truly helps you change up a look and style a few items many different ways.

Below are the 20 outfits I created with the 20 pieces of clothing (Scroll to the right):

Overall, I loved this challenge. I created some outfits that I probably NEVER would have put together had it not been for the limited choices I had for the 20 days. I definitely think that if you plan this challenge properly, i.e. plan in advance and think through your items and how you could potentially style them, it makes for a much more successful 20 days. Here are some other pros to this challenge:

  • Getting dressed was so much quicker in the morning because I only had a certain amount of clothing laid before me to work with. If I knew I wanted to wear a particular item, I would start with that and quickly build around it.

  • I purposely planned this challenge to coincide with a No-Spend month, which was perfect timing because I wasn’t tempted to go thrifting since I knew I couldn’t wear any potential finds until the 20 days were up.

  • I can tend to wear a lot of easy outfits like sweaters and leggings in the winters so I like that this challenge forced me to wear more dresses, skirts, pants, etc, during the week.

  • I definitely felt a sense of gratitude for the items I have in my closet and really thought about how excessive we can be when it comes to fashion. You don’t need hundreds of items to create a bunch of unique outfits. I love that I did this challenge during January because I think it set a good tone for the rest of the year.

However, I will say that by days 18, 19, & 20 I was starting to be over the challenge. I have to admit that while I did technically style a 20th outfit for day 20, I didn’t wear it because I only left the house to go workout and ended up putting PJ’s on after my workout so that I could be comfortable for the rest of my snowy, work from home day.

I am really happy to be back to creating outfits from my entire closet now, but I will definitely do another 20 x 20 this spring or summer! I am really happy that I chose this as one of my 2020 goals (click here to read the other 19 goals), and I encourage you to try something similar if you want to test out a capsule wardrobe, but don’t know if it’s realistic for you!

Have you ever done a challenge like this? What are your thoughts on the matter? Comment below and let me know!

Have a great day,

Andrea

Dre Does 3 New Ways to Tie your Bikini

It's no secret that bathing suits with interesting backs have been a trend for awhile now. Everywhere you look they have extra straps or cool criss-crossed details. Whether you can't afford to buy a new bikini top every time there's a new trend, or (like in my case) you need to be able to adjust and tighten the sizing to support the front, I've got you covered! I'm here just in time for the 4th of July, to show you three new ways to tie your basic bikini so it can look unique in the back! 
This first tie, is how my family always tied their bikinis and what inspired me to make this post. Start by tying the bottom tie how you would normally around your back. Then tie each top strap on that base tie like a bra strap. I always tie double or triple knots and make sure everything is extra tight to guarantee nothing is going anywhere! 
Next we have something similar as above except instead of tying the straps straight back, cross them and tie them to the opposite side. You will also want to tie that bottom tie around your back first like the last tie.
This is my personal favorite tie because I think it looks the coolest. However, if I'm being honest, it's best for those with a smaller chest because it doesn't really offer much support. Just criss-cross your upper straps behind your neck and tie one bottom strap with the opposite upper strap, on both sides. You may have to readjust and re-tie a few times to get the correct tightness. 

I hope you enjoyed this post and discovered a cute new way to tie your bikini this summer! Have a wonderful 4th of July weekend!! 

Dre

Dre Does June Favorites

I'm not quite sure where June went, but it's already time to share my favorites for the month. I don't have that many in the beauty area because I honestly have been wearing the same thing all month long and they are products you have already seen a million times. So here are a few that I've not shared as much, if at all.

Benefit's Rollerlash Mascara: I was lucky enough to try this before everyone else when I was working for Benefit and to be honest I wasn't impressed. My lashes are long but super hard to curl and I didn't feel like I got enough of a curl to ditch my lash curler like Benefit claims. It wasn't until I let the bottle dry out a little and I revisited it, that I fell in love with this mascara. I really do agree that the magic is in the wand. The little hooks really do help pull your lashes up and now that I've let the formula dry a little, I find that the curl does last. On more natural makeup days I will wear this one alone. On days where I do a full face of makeup, I will use this before I use Benefit's They're Real mascara (my holy grail) to really get some great length and curl before They're Real voluminizes my lashes. 

Kenra Platinum Dry Texture Spray & Texturing Mist: I was recommended these two products by the wonderful friend who cut my hair when I donated it last month (Thank you LC)! I have such an obsession with texturizing products because my hair can get very limp and flat looking. My hairstyle is very messy and undone looking and these products make my hair look perfect every time. I use the texturizing mist on my freshly washed and damp hair both when I'm going to blow dry it or if it's air-drying (which I will admit is most of the time since I'm lazy). If I'm working with day two hair or if I've waved it a little, I will use the texture spray to take super neat and flat hair to messy and undone looking. The thing I love most about the dry spray is that it absorbs oil so it can be used like a dry shampoo too. I love how I can take my hair down from being in a bun all day, spray this in and my hair looks alive without having to curl it. It never looks dirty, just effortlessly messy. I absolutely LOVE the smell of both of these products too. I once got asked what perfume I was wearing when it was honestly the Dry Texture Spray! haha

Origins Clear Improvements Mask: I have loved this mask for a long time. It's active ingredient is activated charcoal which is amazing for dissolving all of the impurities in your pores. Simply apply a thin layer of this mask, let it dry and wash it off. I recommend using a warm washcloth when removing to make it a little easier to get off. I love how much this cleans out my pores. I try to do it once a week. 

GapFit Breathe Racerback Tank: I could only find a picture of the hot pink tank but I absolutely love the gray version I have of this tank. I wear it all the time, both for working out and everyday outfits because it fits so well. I personally love a tight fitting tank so I enjoy the cut of them. The neckline isn't too low which I love because as a woman with a larger chest, I don't have to worry about giving someone a free show while I'm at the gym.

Target Women's Carolyn Slip on: I love these shoes. I bought them on a whim one day and have gotten so much use out of them since then (I'm even wearing them as a type this...)! I love that they are off-white, because I get the look of a lighter sneaker without committing to keeping a pair of sneakers stark white. They are super comfortable and with all the holes, I feel like they are breatheable too and don't get stinky like most sneakers do if you wear them without socks. I'm not sure if you can get them in stores anymore, but they are still online if you want to pick a pair up for yourself!

Let me know if you try any of these items! What were some of your favorites this month?

Happy almost July!

-Dre


Dre Does Fall Fashion Essentials


I love fall. The food, the weather, and football are awesome, but I have to say that the makeup and the fashion are my favorite parts about it. So I've decided to share my favorites in both categories in two separate posts. First up is fashion! 

1. Cream Sweaters: I don't really know what it is about cream but I can't get enough slouchy and comfy sweaters in this shade for fall. I currently own at least five and I love them all. I think they help offset all the black and darker colors I love this time of year, while still staying neutral. It's hard to pull off creams and nudes like this as our skin says bye to the summer glow and lightens up, but I think my dark features help me out. I love layering these as the days get chillier and I certainly wear them into the winter months. 

2. Leather Jacket: It doesn't take reading my blog to realize that a leather jacket is a vital fall staple. I feel like fall fashion leans to the edgier side and a good leather jacket can add some instant edge to any girlier look. They're good for throwing over dresses, skinny jeans, etc, and helping us transition those summer outfits into fall weather appropriate looks! I got mine at Forever 21 a few years ago and it's still going strong, so don't think you have to spend hundreds on a genuine leather piece to pull off this look.

3. Simple Basic T's: I love basic T's for fall because they are great for layering. Weather it's under sweaters, jackets, scarves...whatever, t shirts help us in the layering department. If you live anywhere near the Midwest you know how it can be 40 degrees in the morning when you're getting dressed and then suddenly feel like 80 by the time afternoon hits. Bipolar weather is only survived by utilizing layers my friends so always stock up on good basic t shirts. 

4. Military Inspired Jakcet: My army green jacket is from last fall at The Gap and I'm obsessed with it. While mine doesn't have a hood like this one, it does cinch in the waist which I love. Sometimes with layers, things can get a little bulky and your shape can get lost beneath, so jackets with cinched waists are always your friend! I love how army green is relatively neutral, so I mix it with blacks, nudes, and grays for fall and love the outcome! I always love using a scarf with a pop of color with this jacket because it's a bit unexpected. 

5. Infinity Scarves: If you don't own at least one infinity scarf by now I'm not really sure how you managed it but I'm obsessed. I love how effortless and easy they are to throw on and not only keep you warm, but also keep you looking stylish. While dark fall colors like black and burgundy are fun, I like wearing ones with bright colors to accessorize my outfits since I already wear so much black. 

6. Ankle Boots: I was hesitant last year to pick up a pair of ankle boots because I feared they would make my legs look shorter but I've never gotten so much use out of a pair of shoes! Mine have buckles and a zipper, but they seriously look amazing with everything! Skinny jeans, dresses, skirts...you name it!

7. Crossbody bags: I don't know what it is about fall but I hate actually holding onto a purse, so crossbody bags save me. I love neutrals (shocker I know...haha) because once again they go with my favorite fall wardrobe colors. I have been liking the mid sized crossbody bags more as opposed to the really little ones, because I find as I'm getting older, I need more room for things.

8. Black Skinny Jeans: I love good old fashioned dark washed skinny jeans, but there's something about black that I love for fall and winter. They make my legs look the best and match everything I have in my wardrobe. 

What are your favorites for fall? Let me know below and look for my Fall Makeup Essentials coming later this week! 

Have a beautiful week,

Dre

Dre Does a Fashion Haul

I had some time to kill the past two nights and somehow ended up in both Forever 21 and H&M on separate nights. While I didn't get much, I did find some good things so I figured I would share because I love both the items and the prices!  WARNING: I live in black clothing so that's 99% of what you're about to see. I just can't help it guuuuuuys! 

First up, H&M! I did get a lose v-neck black sweater with quilted leather paneling on the shoulders but I can't find a link online so sadly I can't show it to you! It's my favorite piece that I got though and I highly recommend browsing your local H&M to find it. It is long and covers everything to wear leggings so I'm excited to add it to my fall wardrobe! 
I saw this pencil skirt and immediately fell in love. At $17.95 and the perfect fit, I couldn't pass up a pencil skirt with the perfect leather detailing. I can't wait to style it! 


This was another basic that I couldn't pass up because a black circle skirt is a fashion must have. Once again at only $17.95 you can't beat H&M's stylish pieces at a fraction of the cost.

The following night I stopped in Forever 21 and like usual I tried a million things on but only ended up liking a few. 


This sweater was only $19.80 and super comfy and soft. I bought it in a large mainly because I couldn't find any smalls or mediums but I really liked how baggy and loose it was on me. It screamed fall and I love the lace trim on the bottom. It gave me an excuse to buy another comfy cream colored sweater so I can't be mad about that!


Next, I bought this simple black dress for 3 main reasons. First it was only $13.80, but it also fit really well. Since I am the definition of an hour glass figure, it's really hard to find dresses that are fitted enough in the waist without being too small everywhere else. I also loved that I could wear a regular bra with it because that's just 100% necessary when you are too well endowed! Also, it is not this short on me because I don't have 2 mile long legs like the model sadly...

So that's what I picked up this week! Let me know if you got any good finds recently for fall! 

Have a beautiful day,

Dre

Dre Does a Fashion Quick Fix

As I was getting dressed yesterday morning I put on a dress that I love. The only problem is that depending on what bra I wear, it is sometimes see-through. Which got me thinking. I hate when you have to wear a tank or camisole under a dress because you can see your bra. Normally they bunch at my waist and they're impossible to keep straight and smooth. So I went back to my closet and pulled out my trusty black crop top. I know what you're thinking. How is a crop top going to fix this? Well, since this particular crop top is tight fitting it is perfect for wearing under dresses as a shortened camisole! I have done this numerous times and I highly suggest investing in some crop tops for this reason even if you wouldn't wear them alone! Since they are shorter they generally end at your natural waist and there won't be any excess fabric left to bunch up and make awkward rolls through your dress! 

Do you have any fashion quick fixes like this? Leave me a comment and let me know! 

Have a beautiful week,

Dre

Dre Does Current Fall Fashion Lusts

As much as I don't want to admit it because it means summer is coming to an end, I am really excited for fall. I baked my first fall-themed recipe (apple cinnamon muffins that were too die for!) and I've been glancing more at fall fashion so I think it's time I admit it. I'M READY FOR YOU FALL! It's like the time when I kept listening to Rhianna songs on repeat but refused to admit that I liked her. Was that a bad analogy? Oh well! Let's talk clothes!!

Warning: I wear a lot of black as a makeup artist, so I gravitate towards black. I just can't help it! It is so easy to pair and always matches a red lip. As Rachel Zoe once said, "I'll stop wearing black when they make a darker color".

I tried this blazer on at H&M last week, in all black (shocker!) and I was in love. This pastel pink color is really starting to grow on me though. The leather detailing along the lapel and the pockets is so great and it fit so well. You're probably wondering why I didn't get it, but the truth is I was visiting this H&M for the first time since it opened and I had a strict list of what I needed and I was trying so hard not to deviate from it. Go me. I'm going to be going back soon and I figured if that size 6 black blazer is still waiting there for me, it will just be meant to be in my closet. Maybe it will even take a trip into Sale-land before then. (A girl can dream)


This skirt from Express gives me life. I love anything that hits at your natural waist because I am definition hour glass shaped and if I don't emphasize my natural waist, I can look much heavier than I actually am. I love how this is knee length but has the sheer panel. I think it adds a classy bit of sexiness in an unexpected way. I will for sure be stalking this online and waiting for some great Express coupons to make sure it becomes mine!


This jacket from The Gap is beautiful. If you know me personally you probably know my obsession with Gap. I get all of my jeans and pants from them and find that if I want a good classic piece that is going to last in my wardrobe for a while, The Gap is my place to go. I love the shade of gray of this jacket and can already think of a million tanks in my closet that I would pair it with to transition my summer wardrobe into fall.

You will be seeing many more of these posts as we get closer to fall and I spend more time browsing fall collections. What do you have your eye on for fall? Send me links, pictures, whatever! I love to get inspiration from others. 

Have a beautiful start to your week,

Dre

Dre Does July Favorites

| Click to enlarge |

I never really realize how fast the months go by until I do my favorites posts. I feel like yesterday was the 4th of July! As usual my month was really busy, getting used to a new job and dealing with a severe allergic reaction to something so while I didn't try that many new products out, I have been loving some good ones! So let's recap the items I've been obsessed with this month! 

1. Browzings by Benefit Cosmetics: I have been using this product nonstop since I started working as a Benefit Arch Expert. I use it on every guest to map their brows for waxing, but also use it daily on my brows. I love that it comes with both a tinted wax and powder. I use a quick tap of them both together to fill and define my brows. The wax helps hold brow hairs in place and also makes the powder adhere better. It gives a very natural, yet defined look that I love!

2. Revlon Colorstay Foundation: I hadn't tried this foundation until June but I'm obsessed. It really does last all day and I love that it comes in two formulas (one for drier skin types and the other for combo/oily skin types). I really like mixing it with other foundations to give a long lasting flawless finish to my skin. 

3. Tarte Amazonian Full Coverage 12-HR Foundation: This foundation is a holy grail product as well. I'm not sure if I've ever mentioned it before, but I love the texture. It's a mousy one that gives a liquid to powder feeling to the skin. It's buildable from medium to full coverage and for oily skin it's a dream! When you rub it in, it really feels like nothing on the skin! It's no secret that I have a love affair for tarte cosmetics so if you're oily and wanting to try out a new higher end foundation, go give it a look!

4. Benefit's They're Real PushUp Liner: I know that this new product from Benefit has been getting mixed reviews but I truly love it. I have a very hard time finding a liner with an applicator that I love but this one is amazing! One unique feature that I love is that you control the amount of product you use by clicking it up at the bottom. If you're comfortable with liquid and gel liners I definitely think you should try this one. I can apply a big dramatic winged liner in the morning before work and know that when I get home 10 hours later it will look the exact same as when I left. I love the matte finish too. It looks very natural. I love to show guests how using the flat and wide applicator you can create a "no eyeliner, eyeliner" look to make your lash line look fuller. Comment below if you'd like to see how I accomplish this!

5. White Straw Tribal Clutch from LOFT: I hate to include things you can no longer find but I like the idea behind this bag so I had to include it. I bought this at LOFT probably about 2 or 3 summers ago because I loved it. It was neutral and summery, but could fit a lot. The tribal print trend has been going for awhile but I thought this was a more subtle way to incorporate it into my wardrobe because it wasn't as flashy. I can't even begin to tell you how much I use this bag. It pairs with everything in the summer and gives an interesting texture to outfits and can be paired with black and white or even bright colors! If you find something you love and you can picture using in multiple ways, I say always get it. 

6. Essie quick-e Drying Drops: I can't do my nails without these drops anymore. Half the time I skip out on doing my nails because I don't have time to sit around and wait for them to dry. Not anymore! Just use the little dropper to apply a 1 to 2 little drops per nail and you're polish will be dry in no time! I love them and highly recommend them to all nail polish junkies or women on the go!

7. Cargo Swimmables Water Resistant Bronzer: I bought this bronzer because the ULTA I work at is no longer carrying Cargo Cosmetics so it was ridiculously discounted. I actually bought 12 other products too for a steal so look for a review on all of that soon! Luckily you can still buy the products on Cargo's website so when I fell in love with this bronzer I had to share. While I haven't gone swimming with it on because I'm not a fan of wearing makeup in the water, I do find it has great lasting power all day! The tone is really nice, a little warmer then I like to use for contouring but since it has shimmer I use it to give my face more of a glow anyways! It's also very smooth and blendable.


What were you loving this month? Leave a comment and let me know! I'm always down to try new things :) Hope your July was fantastic and happy August!

Have a beautiful day,

Dre

Dre Does a DIY: T-Shirt Dress

Here is the other DIY that I have brought over from my previous blog because of the popularity (as you will probably be able to tell, these are the original pictures...haha). I can't even tell you how many of these my friends and I made and wore throughout college for various events. You can use it to cheer on your favorite sports team, celebrate your favorite holiday (This would be a perfect 4th of July Beach cover up), or even a concert outfit!

Four years ago when I was preparing for the World Cup, I came across a T shirt with the Brazilian Flag across it and seeing as I'm a Brazilian I needed to own it. However, the problem was that the only shirt left was an XL and there was no way it was going to fit me. I bought it anyways with the idea that I would some how cut or pin it to make it work. When I got it home I thought I would just chop off the collar and wear it as an over sized, off the shoulder shirt. Then I accidentally cut too much off and realized it wasn't going to work. Too stubborn to admit defeat, I started playing with it until I came up with the design below. It works great for any basic unisex tshirts. I normally wear a small or medium size, so if I want to make a shirt I would use a Large and if I want to make a dress, an XL. Below I've shown step by step directions on how to create your own DIY dress or shirt and provided two other pictures of times I've made them, including the original Brazilian Flag Dress! I hope you enjoy this and find a new use for an oversized T shirt that you might not have ever worn!

Step 1: After laying the T shirt flat, cut it along the bottoms of the sleeves. Also make one huge cut from the top of one sleeve, across the chest (under the collar) and across the top of the other sleeve. So basically cut everywhere you see red above!

Step 2: This is what it should look like. Notice how I wasn't too neat cutting the top? No worries! If you stretch the T shirt from shoulder to shoulder, the edge will roll over, creating a smooth looking 'faux-hem'.

Step 3: That's it for cutting! All you have to do is tie it on now! To do so, step into the shirt. As you can see I'm holding the front of each sleeve in my hands and the back portion is what has fallen to the sides and is behind me.

Step 4: Twist the sleeves and bring them to the back and tie them in a double knot. (Sorry for the exposure of my bra! haha)

Step 5: Hold the back portions of the sleeves that were falling to the side before.

Step 6: Twist the sleeves towards your body.

Step 7: Once twisted, tie them in a double knot and tuck the ends into the dress

Step 8: Adjust the back so everything is covered!


This is the finished product! I hope you enjoyed this! It's quick and easy and a great way to show spirit without wearing a typical T shirt like everyone else. Below are two of the other dresses/shirts that I have made, one for a concert when I was in college and the other is the original Brazilian flag dress that inspired this whole design!


I hope you enjoyed this DIY! If you make your own to cheer on your favorite sports team, celebrate the 4th of July, or something else just as fun, be sure to tag me on Instragram with #dredoes! 

Have a beautiful day,

Dre

Dre Does a DIY: Dip-Dyed Shorts

The fourth of July is almost here and to celebrate I'm bringing one of my most popular DIY's from my old college blog, to Dre Does! I can't believe it's been two years since I made these shorts but I absolutely loved them. I know with the World Cup currently underway and the 4th around the corner, many of you might like to learn how to make these ridiculously festive shorts! If you make them please be sure to take a picture and tag them on Instagram or Twitter with the #dredoes! Here's a finished shot of the shorts I made and tutorial on how to make your own. The whole project cost me less than $9!


I started with an over sized pair of shorts from a thrift store that I picked up for $2. I tried them on and marked them with a sharpie about a half inch lower than I wanted them to hit when finished. I cut them with sharp fabric scissors and tried them on to check for the length. You might have to take them on and off and make adjustments until they are the right length and straight. Then I took a fork and using the tines, I distressed the edges to give them a better 'cut-off' look. When you put them in the dryer later they will fluff up more and look better so keep that in mind when distressing! Make sure you leave that extra length for distressing so that they aren't too short in the end. I also snipped a little bit out on the front to look like there was a rip. I distressed the 'rip' also with a fork. Here's a picture of what they looked like after this step:

Now it's time to bleach! I bought a bottle of bleach at my local dollar store (total cost so far is $3). It's really important when using bleach that you are in a well ventilated room so make sure you're doing this either outside or all the windows are opened! There was nothing too specific about this step besides adding bleach to a container and adding some cold water too. Since I was trying to make stripes I dipped my shorts 2/3 of the way up from the bottom and hung them on the side of my bucket for about an hour. Depending on the denim quality your shorts might bleach really quickly or take a long time. Whatever the case may be, make sure you don't leave them overnight because the bleach can eat away and destroy the fabric. Once the shorts are white enough for your liking, wash them on cold in the washing machine. I noticed that the bleaching process continued a little bit into the washing and they came out a little whiter. Next I dried them in the dryer until completely dry. Now it's time to stud! I bought my silver pyramid studs at my local craft/hobby store for $1.50 a pouch and used 2 pouches for my shorts (total cost so far is $6). Depending on your denim it might be a little tricky to pop your studs through, but basically all you do is push the two sharp prongs through your fabric and push them towards each other until flat. I used the wooden handle of a kitchen knife after a few because it was starting to hurt my fingers. Be very careful with this part if you decide to use a knife! I studded the front pocket of my shorts and the back pockets. Here's a picture of what the shorts looked like this far:


Now it was time to add some red and it couldn't have been any easier. Going into this project I thought I was going to have to deal with the traditional tie-dye process including mixing powders and putting in squeeze bottles, etc. However I was pleasantly surprised when I found spray tie-dye bottles, already mixed, at my local craft/hobby store for only $2.50! (final cost of project is $8.50) They had a good amount of colors too so I definitely recommend it. All I did was have a friend hold them over the lawn outside and I sprayed red dye on the bottom third of the shorts. Then I just laid them out on the grass to dry in the sun for about half an hour. The back of the bottle said to then dry them in the dryer until completely dry to set the dye but this is going to be dependent on whatever dye you choose. I haven't washed mine since so I'm not sure how much they will fade but make sure you wash them alone if you decide to. And that's it! You now have your very own pair of dip-dyed, ombre shorts! Have fun experimenting with different colors and patterns! After all it's only going to set you back about $9 a pair!
I hope you enjoyed this DIY and are inspired to rock some festive shorts this holiday! Look for one more DIY on Friday from my old blog that you can use for celebrating!

Have a beautiful day,

Dre


Dre Does A Necklace Trick

If you know me at all, you know that my brain is constantly going. I'm always thinking of new things and am a bit crazy at times but it just fuels my creative side...right...? Haha anyways I have this one area on my counter where I always throw my jewelry when I'm taking it off at night and too lazy to put it where it goes. Well one morning after I did this I noticed that my necklace was flipped over and the back of it looked like a completely different necklace but still looked good...? (Now you understand the crazy brain reference). Well this got me thinking. Geometric necklaces and shapes are huge right now in the statement necklace world, so I wonder what would happen if I just wore my necklaces turned around... Turns out they look pretty cute! I really like how I can have a huge statement with the normal patterned side of the necklace, but if I want to I can just flip it over and have a more subtle gold necklace that is still the same shape as the original necklace. So I recommend going through your statement necklaces. You might be surprised what you find! I've been honestly wearing my necklaces more on the plain gold sides instead of the original sides.

Here are some examples of the two necklaces I have been doing this most with!


Don't be afraid to look at jewelry, fashion, makeup, anything with an open mind. There are no rules and the only person who has to like what you're wearing is you! If you want to rock necklaces backwards do it! 

Have a beautiful day,

Dre

Dre Does May Favorites

Favorites posts are some of the most fun to write because I love sharing all of the things I love with you! Coincidentally May is my favorite month because of my birthday and the weather finally deciding to warm up, so I like this post even more! Here we go :)

(Top row L to R)
1. Sam Smith: If you don't know Sam Smith by now you're probably living under a rock. He's been featured in a bunch of new songs lately like Latch and La La La, so chances are even if you don't think you know of him, you've heard him. His voice is unreal and you need to listen if you haven't. He's the perfect blend of R&B and pop and I can't get enough. His song Stay With Me is my ultimate fave but others are slowly creeping up to that honor too.

2. The Body Shop Body Butter in Coconut: I bought the small version of this body butter when I was in Chicago for Memorial Day. I'm kicking myself now for not buying the massive jumbo sized tub because the smell and feeling are so luxiourous and wonderful. The scent is perfect for summer and the dry skin that the sun leaves us!

3. Victoria's Secret Forever Sexy Twist Bandeau Top: I finally broke down and bought this bikini top in black after much consideration. The fact of the matter is that if you have a larger bust you need to invest in a good bikini top with underwire that fits and feels secure. I'm just trying to get a tan, not give everyone a free show! I highly recommend this bikini if you have bigger boobs and have a hard time finding bikinis!

4. MAC Cosmetics Fix +: This setting spray is my favorite because you can also use it before your makeup. If you want to make your eyeshadow pop, spray your brush with it beforehand and then go into your eyeshadow. This will intensify the shadow so much and help it stay put! I love setting my makeup with it though because I feel like it just melts everything together to give me a blended and seamless look! 

(Bottom row L to R)
5. Havaianas in as many colors as possible: I challenge you to find a Brazilian that doesn't own at least a few pairs of Havaianas. They are the only flip flops I wear and I have at least 10 pairs... They are the most comfortable to me and I'll stop wearing them when I stop being Brazilian...so NEVER! I think I own one other pair of flip flops that aren't Havaianas but even at that they are still a Brazilian brand haha

6. Proenza Schouler for MAC Cosmetics Lipstick in Mangrove: When I was at the MAC counter a few weeks ago, I spotted this packaging and I said a little prayer silently that there was a shade that would justify me spending that much money on a lipstick. Luckily I found Mangrove! A beautiful vibrant coral that screams summer and tan skin. I've worn it a few times and every time I get compliments. The packaging is the most beautiful thing I've ever seen and I will cherish this lipstick for a long time! (That sounds super dramatic but if you're reading this you probably have had a similar love affair with a lip product before...right...? Haha)

7. Kettle bell: I recently picked up a kettle bell from my local Target because it was on sale and I was dying to own one. I'd been using one at the gym I'd been going to but since I moved I have been working out at home. I'm obsessed with it! It's so much fun and I'm seeing huge results, especially in my arms. They're the most toned and muscular that they've ever been and I owe it to this little friend! If you YouTube kettle bell workouts there are plenty of ideas on how to get started. I also love how it doesn't take up much space to store or to use.

8. MAC Cosmetics Pro Longwear Concealer: Behold my favorite undereye concealer of all time. It covers so well and doesn't crease at all. I make sure to set it with a finely milled translucent powder after applied but I do this will all concealer to prolong the wear. The difference when applying to undereye darkness and circles is insane and I don't think I'll ever go without it. I had heard so many good things about it so I finally picked it up and I couldn't be happier that I did! I will probably be doing a review on it soon if you'd like to see that!

There they are...my favorites of May! Let me know in a comment below what you were loving! 

Have a beautiful day,

Dre